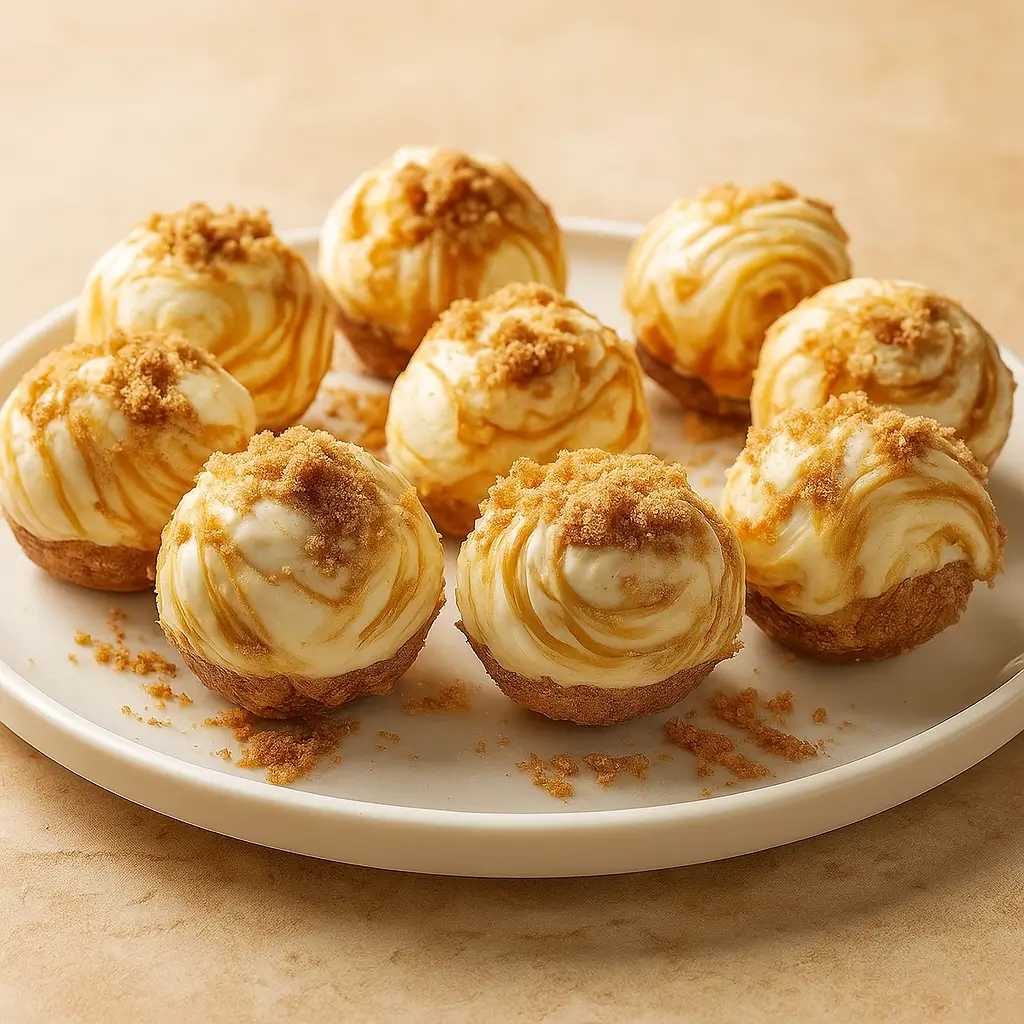
If you’re craving that cozy fall flavor but don’t feel like turning on the oven, No Bake Pumpkin Cheesecake Balls are about to become your new seasonal obsession. These creamy, spiced little bites deliver all the goodness of pumpkin cheesecake without any of the baking drama. No crust, no water bath, no fuss—just simple ingredients, a quick chill, and dessert magic.
Table of Contents
What is No Bake Pumpkin Cheesecake Balls?
No Bake Pumpkin Cheesecake Balls are like a shortcut to fall dessert heaven. Imagine your favorite pumpkin pie and classic cheesecake decided to have a cute, bite-sized baby—rich, tangy, creamy, and perfectly spiced. The best part? You don’t need an oven or fancy equipment. You just whip up a quick cream cheese and pumpkin filling, roll it into little balls, and coat them in graham cracker crumbs for that “cheesecake crust” feel. They chill beautifully in the fridge, making them ideal for make-ahead treats or holiday spreads. Honestly, they’re like truffles dressed up for pumpkin season.
Reasons to Try No Bake Pumpkin Cheesecake Balls
First, they’re no bake, which means zero oven time—so your kitchen stays cool, and you stay sane. Second, they’re the perfect bite-sized indulgence: rich enough to satisfy a sweet tooth but small enough not to derail your day. Plus, the flavor? Think cozy sweater weather in edible form—pumpkin spice, velvety cream cheese, and a sweet graham cracker finish. They store well, travel easily, and make a crowd-pleasing dessert for potlucks or Thanksgiving parties. If you love easy fall desserts like my Pumpkin Cottage Cheese Bake, you’ll fall head over heels for these.
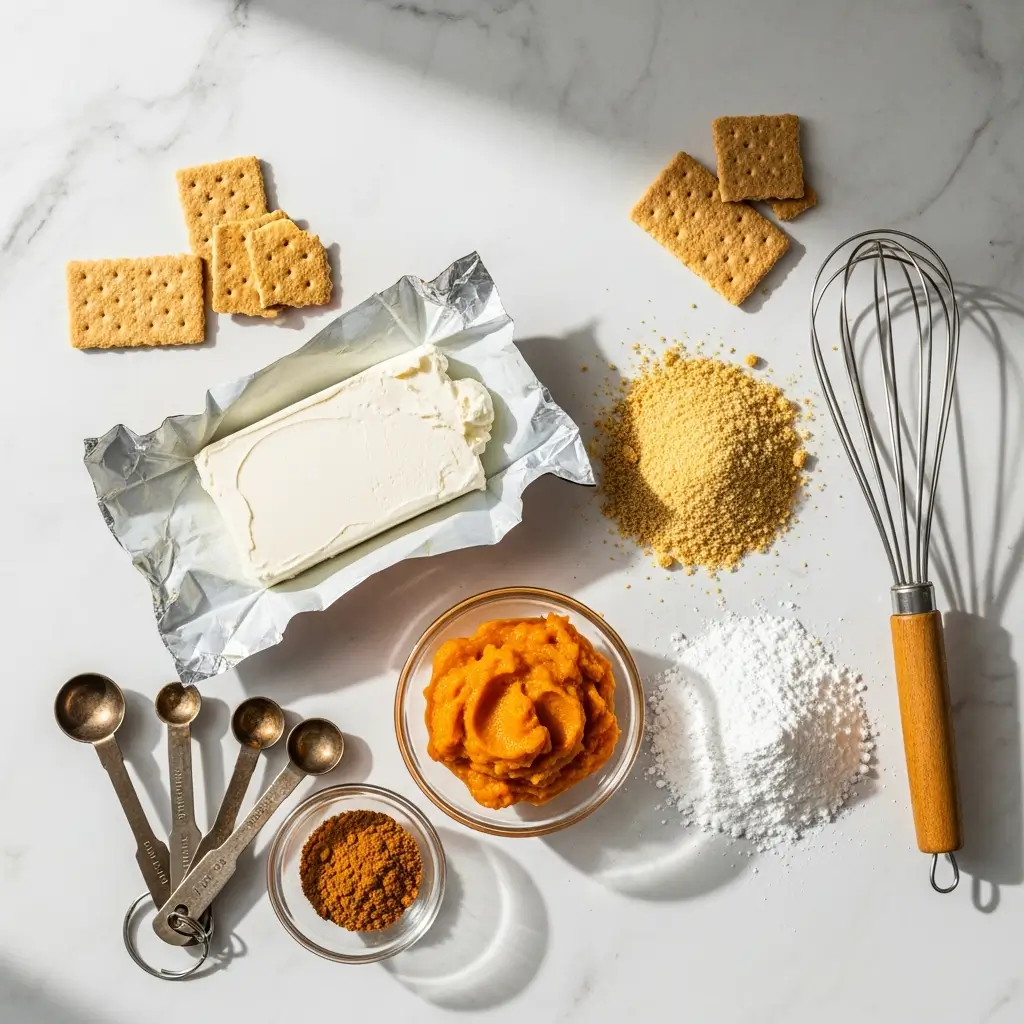
Ingredients Needed to Make No Bake Pumpkin Cheesecake Balls
- 8 oz cream cheese, softened
- ½ cup pumpkin puree
- 1 cup powdered sugar
- 1 tsp vanilla extract
- 1 tsp pumpkin pie spice
- 1 cup graham cracker crumbs (for rolling)
Equipment
- Mixing bowls
- Spatula
- Baking sheet
- Cookie scoop or spoon
Instructions to Make No Bake Pumpkin Cheesecake Balls
Let’s dive into this step by step guide for making the creamiest, easiest No Bake Pumpkin Cheesecake Balls you’ll ever try. No baking, no complicated techniques—just a few bowls, a spatula, and a little fall magic.
Step 1: Mix the Cream Cheese and Pumpkin Base
Start this step by step process by grabbing a large mixing bowl and adding your softened cream cheese. This is your creamy foundation, so make sure it’s at room temperature; otherwise, you’ll end up fighting stubborn lumps. Use a hand mixer (or a strong arm and whisk) to beat the cream cheese until smooth and fluffy—think whipped clouds, not cottage cheese.
Next, spoon in your pumpkin puree. Choose 100% pure pumpkin, not pumpkin pie filling—it’s a big difference in flavor and texture. Blend the pumpkin and cream cheese together until they’re fully combined and you get that beautiful orange hue that screams autumn.
If you’re curious about making your own pumpkin puree from scratch, you can check out our post on Pumpkin Cottage Cheese Bake for some handy prep tips that also work beautifully here.
Step 2: Sweeten and Spice It Up
Once the base looks smooth, it’s time to sweeten and season. Add your powdered sugar a little at a time (no one likes sugar clouds poofing into the air), followed by the vanilla extract and pumpkin pie spice. Mix thoroughly until everything is silky, creamy, and your kitchen smells like a fall candle shop—only better because you can actually eat it.
For a twist, if you prefer more spice or want to go sugar-free, try swapping in a natural sweetener or experimenting with homemade pumpkin spice blends. You can find similar flavor customization ideas in my Banana Oatmeal Muffins article, which covers balanced sweetness and spice pairing.
Step 3: Chill the Mixture
Here’s where a little patience pays off. Cover the bowl tightly and place it in the refrigerator for about one hour. This chill time is essential—it helps the mixture firm up so it’s easy to roll later on.
If you’re in a hurry, a step by step shortcut is to pop it in the freezer for 25–30 minutes instead. Just don’t forget about it (been there, done that—cheesecake ice blocks are not the goal). While it chills, take a moment to set up your workspace: line a baking sheet with parchment paper and pour graham cracker crumbs into a shallow bowl for rolling.
Looking for make-ahead tricks while you wait? You might love our Breakfast Pancake Poppers guide for more smart prep ideas that save time in the kitchen.
Step 4: Roll the Cheesecake Balls
Once the mixture feels firm and scoopable, it’s time to roll! Using a small cookie scoop or a spoon, portion out about one tablespoon of the mixture per ball. Roll it gently between your palms until it forms a smooth, even sphere—kind of like shaping cookie dough, only softer and creamier.
For consistency, aim for 1-inch balls. You should get around 24 in total, but if a few go missing during “taste testing,” no judgment here.
If you’re making these with kids, this step by step rolling part is perfect for little hands to help out (just maybe set aside a few for the adults before they disappear).
Step 5: Coat in Graham Cracker Crumbs
Next, roll each ball through the graham cracker crumbs until completely coated. The crumbs act as a “cheesecake crust,” giving every bite that classic buttery crunch. If you want a little extra flair, mix some crushed gingersnaps or cinnamon sugar into your coating—trust me, it’s heavenly.
You can also check out texture layering tips in my Garlic Parmesan Cheeseburger Bombs post—while that recipe’s savory, the same idea of coating for crunch totally applies here.
Step 6: Chill Again and Serve
Place your crumb-coated cheesecake balls onto the lined baking sheet and refrigerate for another 30 minutes. This final chill helps them firm up perfectly and enhances their flavor.
When ready to serve, arrange them on a platter and watch them disappear faster than the last slice of pie at Thanksgiving dinner. These No Bake Pumpkin Cheesecake Balls are divine straight from the fridge, but if you prefer a creamier bite, let them rest at room temperature for 5–10 minutes.
Want to take them over the top? Drizzle melted white chocolate, sprinkle chopped pecans, or dust lightly with cinnamon for a bakery-worthy finish.
If you’re planning a full fall spread, pair these treats with a warm drink or one of my savory comfort favorites like Lentil Potato Soup. It’s the perfect sweet-and-savory combo for chilly days.
What to Serve with No Bake Pumpkin Cheesecake Balls
These little bites play well with almost anything. Try serving them with warm apple cider, a pumpkin spice latte, or a simple black coffee for contrast. They also make a great addition to fall dessert platters alongside cookies, brownies, and Chopped Fall Harvest Salad for a cozy autumn gathering. If you’re entertaining, drizzle them with melted white chocolate or sprinkle crushed pecans on top for a fancy touch.
Key Tips for Making No Bake Pumpkin Cheesecake Balls
- Use room-temperature cream cheese so your filling mixes smoothly. Cold cream cheese can make the texture lumpy.
- Don’t skip the chill time—it’s the secret to perfect, firm balls that hold their shape.
- Adjust sweetness to taste. If you like your cheesecake a little tangier, cut back on the powdered sugar by a tablespoon or two.
- Switch it up! Roll in crushed pecans, gingersnap crumbs, or coconut flakes for fun variations.
- For an extra hit of spice, add a pinch of cinnamon or nutmeg.
Storage and Reheating Tips for No Bake Pumpkin Cheesecake Balls
Store your No Bake Pumpkin Cheesecake Balls in an airtight container in the fridge for up to 5 days. They taste even better the next day as the flavors blend together. You can also freeze them for up to 2 months—just let them thaw in the fridge before serving. If they seem too firm after chilling, let them sit at room temperature for 5–10 minutes before biting in. These also make great make-ahead treats for parties, picnics, or office potlucks.
FAQs
Can I make these dairy-free? Yes! Swap in vegan cream cheese and use coconut cream instead of pumpkin puree for a tropical-autumn twist.
Can I use fresh pumpkin instead of canned? Absolutely, just make sure it’s pureed and drained well—extra water can make the mix too soft.
How long do they last out of the fridge? About two hours at room temperature—any longer, and they’ll start to soften.
Can I add chocolate? Please do. Melted chocolate drizzle or mini chips mixed into the batter are both fantastic.
Final Thoughts
These No Bake Pumpkin Cheesecake Balls prove that you don’t need an oven—or hours in the kitchen—to create something delicious, festive, and satisfying. They’re simple, creamy, and guaranteed to disappear faster than a PSL on the first cold morning of fall. So the next time you’re craving pumpkin cheesecake but want something fast, grab your mixer and roll up some pumpkin bliss.
For more cozy autumn recipes, take a peek at Fall Harvest Salad or this hearty Lentil Potato Soup for a warm and balanced meal before dessert.
Visit our Pinterest for regular slow cooker recipe updates, or join our Facebook discussions where cooking fans exchange their favorite hearty meal ideas.
Print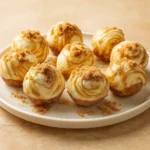
No Bake Pumpkin Cheesecake Balls – Easy Fall Dessert Bliss
- Prep Time: 20 minutes
- Cook Time: 0 minutes
- Total Time: 20 minutes
- Yield: 24 balls 1x
- Category: Dessert, Snack
- Method: No-Bake
- Cuisine: American
- Diet: Vegetarian
Description
Creamy pumpkin cheesecake rolled into bite-sized balls 🎃🧀—a quick, festive, and indulgent treat perfect for fall gatherings!
Ingredients
- Pumpkin Cheesecake Balls
- 8 oz cream cheese, softened
- 1/2 cup pumpkin puree
- 1 cup powdered sugar
- 1 tsp vanilla extract
- 1 tsp pumpkin pie spice
- 1 cup graham cracker crumbs (for rolling)
Instructions
1. In a large bowl, beat cream cheese until smooth. Add pumpkin puree, powdered sugar, vanilla, and pumpkin pie spice. Mix until creamy and fully combined.
2. Cover and chill the mixture for 1 hour to firm up.
3. Using a small cookie scoop or spoon, form the mixture into 1-inch balls. Roll each ball in graham cracker crumbs until coated.
4. Place the balls on a lined baking sheet and refrigerate for at least 30 minutes before serving. Enjoy chilled!
Notes
Perfect for parties, school snacks, or holiday gatherings.
Store in an airtight container in the fridge for up to 5 days.
For added texture, roll balls in crushed nuts or mini chocolate chips.
Nutrition
- Serving Size: 1 ball
- Calories: 120
- Sugar: 12g
- Sodium: 65mg
- Fat: 6g
- Saturated Fat: 4g
- Unsaturated Fat: 2g
- Trans Fat: 0g
- Carbohydrates: 15g
- Fiber: 0g
- Protein: 1g
- Cholesterol: 15mg