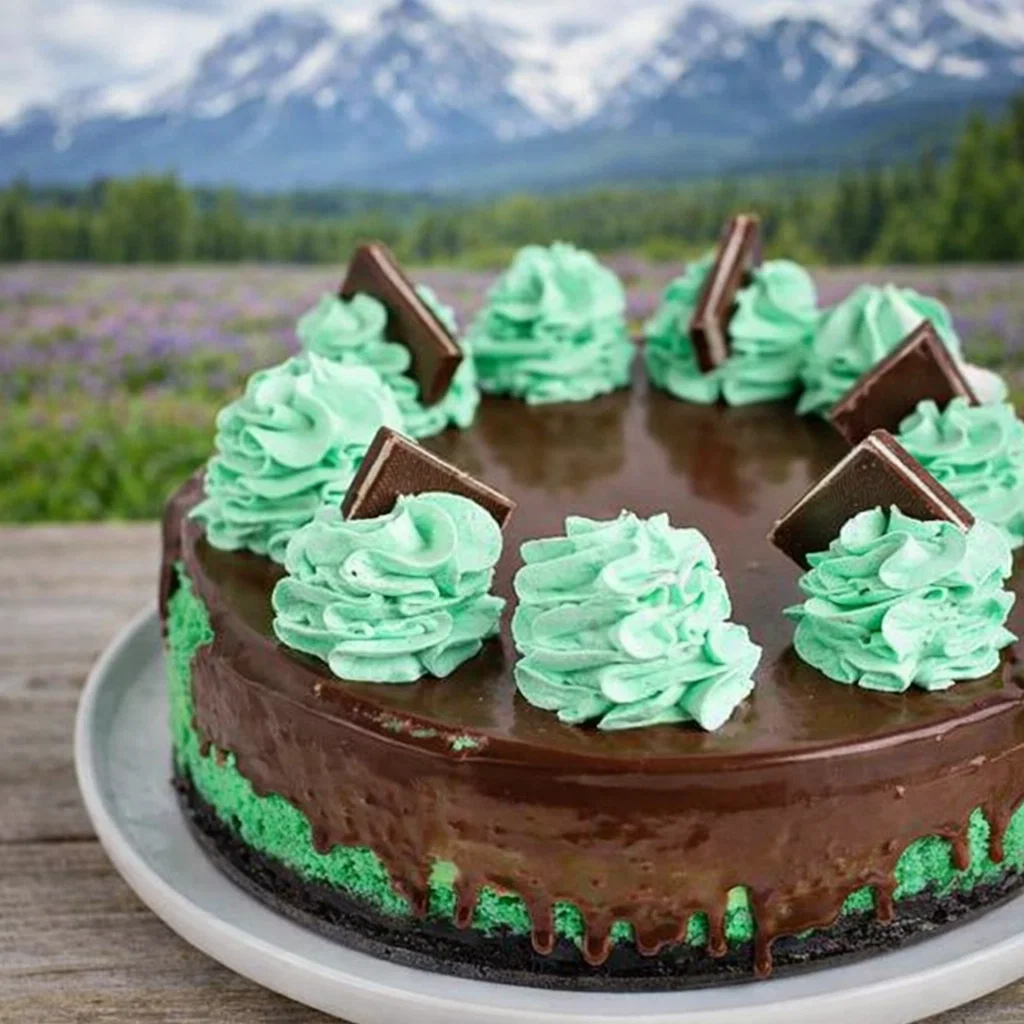
Mint Chocolate Cheesecake is the dessert that makes every chocolate lover’s dream come true. Imagine the cool, refreshing burst of mint dancing with the deep, creamy richness of chocolate—all wrapped up in a luscious cheesecake. This Mint Chocolate Cheesecake features a crunchy mint Oreo crust, a velvety green filling, and a drizzle of milk chocolate ganache that glistens like dessert gold. It’s not only perfect for St. Patrick’s Day but also for those nights when you just need something sweet, rich, and a little fancy without being fussy. Whether you’re baking it for a party or just a weekend treat, this recipe is the kind that makes everyone think you’re a pastry chef in disguise.
Table of Contents
What is Mint Chocolate Cheesecake?
Mint Chocolate Cheesecake is a decadent dessert combining the refreshing flavor of mint with the smooth creaminess of classic cheesecake and the bold flavor of chocolate. The crust is made with mint Oreos and melted butter, creating a crisp, flavorful base that perfectly complements the rich mint filling. The filling is a creamy blend of cream cheese, sugar, eggs, and mint extract, tinted with a hint of green to give that signature festive look. To top it all off, it’s finished with a glossy milk chocolate ganache and swirls of mint whipped cream. This cheesecake strikes the perfect balance—cool, creamy, and indulgently chocolatey—making it ideal for mint lovers and anyone looking for a show-stopping dessert.
Reasons to Try Mint Chocolate Cheesecake
There are so many reasons to fall in love with this Mint Chocolate Cheesecake. First, it’s an eye-catching dessert that instantly brightens any celebration. The contrast of minty green and dark chocolate looks straight out of a bakery display case. Second, it’s surprisingly easy to make. No fancy ingredients or complicated steps—just a few basic tools and some patience while it bakes and chills. Third, it’s versatile. While perfect for St. Patrick’s Day, it also works wonderfully as a winter dessert or a summer cool-down treat. Plus, if you’re a fan of desserts like Green Velvet Brownies with Cream Cheese or Mint Oreo Balls, this one will feel like their elegant big sister.
Ingredients Needed to Make Mint Chocolate Cheesecake
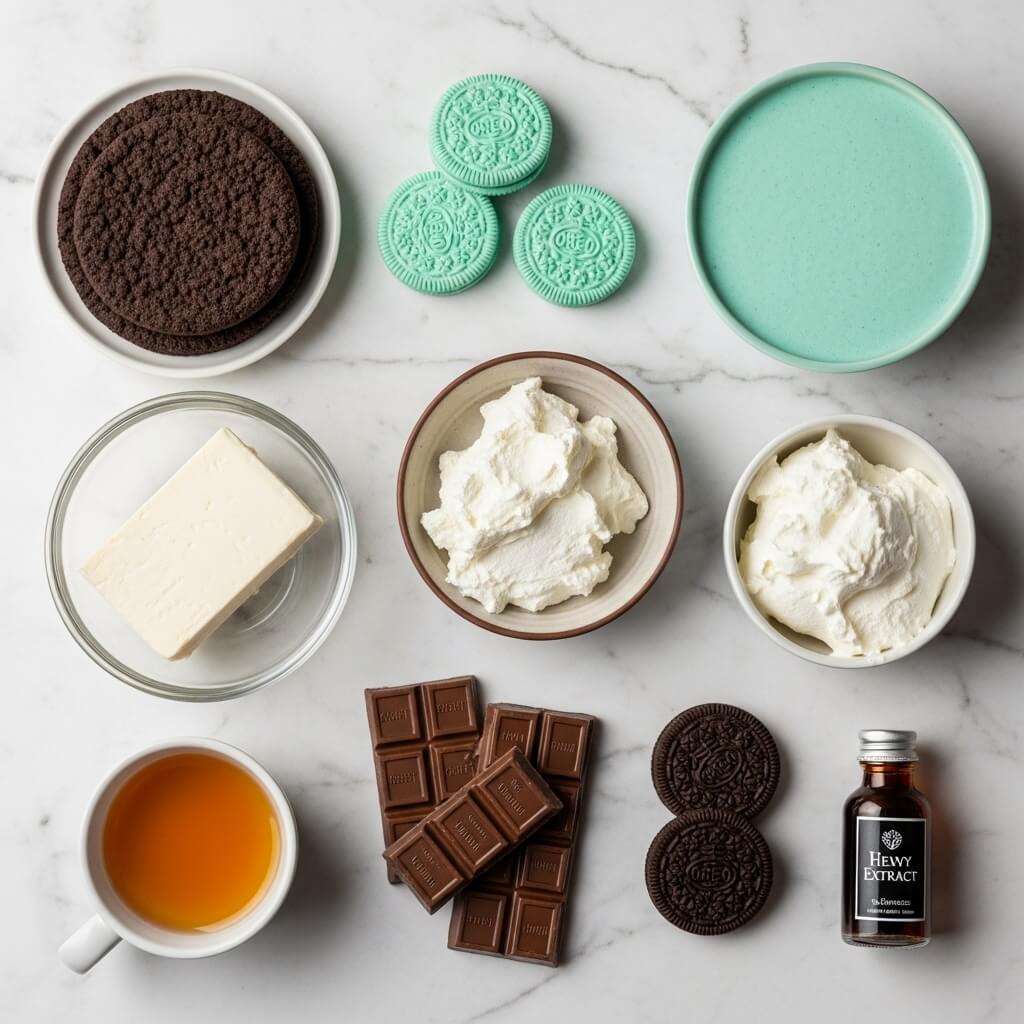
For the Crust:
- 14 Oreo cookies
- 8 mint Oreo cookies
- 4 tablespoons melted butter
For the Cheesecake Filling:
- 24 ounces cream cheese (room temperature)
- 1¼ cups granulated sugar
- ½ teaspoon vanilla extract
- 1 teaspoon mint extract
- 4 large eggs
- 1 cup sour cream
- ½ cup heavy cream
- 6 Hershey’s milk chocolate bars (chopped)
- 2–4 drops green gel food coloring
For the Ganache:
- ¾ cup milk chocolate chips
- ½ cup heavy cream
For the Whipped Cream Topping:
- 1 cup heavy cream
- 2 tablespoons powdered sugar
- ¼ teaspoon mint extract
- 2–3 drops green gel food coloring
- Andes mints (for garnish)
Instructions to Make Mint Chocolate Cheesecake (Step by Step)
Making this Mint Chocolate Cheesecake is a total breeze when you follow this step-by-step guide. Whether you’re new to baking cheesecakes or just want that perfectly smooth, creamy texture, this walkthrough will guide you through each stage with clarity and confidence. So tie on that apron, grab your electric mixer, and let’s get baking—step by step!
Step 1: Prepare the Oreo Crust (Step by Step)
Start by preheating your oven to 325°F. This temperature helps the crust bake evenly without becoming too crisp or hard. In your food processor, toss in 14 regular Oreos and 8 mint Oreos. Pulse them until you get a fine, sandy crumb. If you don’t have a food processor, you can place the cookies in a zip-top bag and crush them with a rolling pin—great stress relief, by the way.
Next, pour in 4 tablespoons of melted butter and pulse a few more times until all the crumbs are evenly coated. The mixture should feel like damp sand—firm enough to hold together when you press it between your fingers. Pour the crumb mixture into a 9-inch springform pan and press it firmly across the bottom. You can use the bottom of a measuring cup for a smooth, compact finish.
Slide the pan into the oven and bake for 10 minutes, just to set the crust. Once it’s done, let it cool while you prepare the filling. If you want a refresher on how to perfect baked crusts for cheesecakes or pies, check out our guide on baking basics and crust preparation—a great read for beginners.
Step 2: Make the Cheesecake Filling (Step by Step)
This is where the magic happens! In a large mixing bowl, beat 24 ounces of softened cream cheese on medium speed until it’s completely smooth—no lumps in sight. Scrape down the sides of your bowl occasionally; this ensures every bit gets mixed properly. Add 1¼ cups granulated sugar and continue to beat until the mixture is creamy and well combined.
Now, blend in ½ teaspoon vanilla extract and 1 teaspoon mint extract—these are your key flavor boosters. Add 4 large eggs, one at a time, beating after each addition until just combined. Overmixing here can add too much air to your batter, which might cause cracks later (and no one wants cheesecake cracks!).
Finally, mix in 1 cup sour cream and ½ cup heavy cream. Add a few drops of green gel food coloring to achieve that vibrant minty hue. Stir in the chopped Hershey’s milk chocolate bars for those irresistible melty bits in every bite.
Pro tip: Want to try different mix-ins? Swap in dark chocolate or even chopped Andes mints for an extra flavor kick. We have a great post on ingredient swaps and creative dessert add-ins that can help you mix things up.
Step 3: Prepare the Water Bath (Step by Step)
This step-by-step might seem intimidating, but it’s actually pretty easy—and it’s the secret to a creamy, crack-free cheesecake. Wrap the bottom of your springform pan with two layers of heavy-duty aluminum foil to prevent leaks. Place your cheesecake pan inside a larger roasting pan.
Fill the larger pan with 1–2 inches of hot water, making sure the water doesn’t go past halfway up the sides of the cheesecake pan. This water bath, or “bain-marie,” keeps the baking environment moist and helps the cheesecake cook evenly.
Before pouring in your filling, lightly spray the inner sides of the springform pan with nonstick spray. Then, pour in your cheesecake batter and smooth the top with a spatula.
Step 4: Bake the Cheesecake (Step by Step)
Place your water bath setup in the oven and bake for 1 hour and 20 minutes. To test for doneness, gently wiggle the pan. The center should jiggle slightly, like gelatin, while the edges should look set. If it still moves like liquid, bake for a few extra minutes.
Once it’s done, turn off the oven and crack the door open slightly. Let the cheesecake cool inside the oven for at least 30 minutes—this gradual cooling helps prevent cracks. Afterward, move it to the counter and let it cool to room temperature before refrigerating. Chill for at least 4 hours, though overnight chilling gives the best texture and flavor.
While you wait, you might want to plan your meal around this show-stopping dessert! If you’re looking for a main course idea, try something savory like Crockpot Honey BBQ Wings or Slow Cooker Honey Bourbon Meatballs—both are crowd-pleasers that pair perfectly with a sweet ending like cheesecake.
Step 5: Make the Ganache Topping (Step by Step)
Once your cheesecake is chilled and set, it’s time to add that glossy, chocolatey finish. In a microwave-safe bowl, combine ¾ cup milk chocolate chips and ½ cup heavy cream. Microwave for 1 minute, then stir until the chocolate starts melting into the cream. Heat again for 30 seconds if needed, and stir until smooth and shiny.
Pour the ganache gently over the cooled cheesecake, spreading it evenly to the edges. Let it chill in the fridge for about 30 minutes so it sets into a silky layer. If you’re a chocolate lover, check out our Chocolate Mint Cream Cheese Buttons for more minty dessert inspiration.
Step 6: Whip and Pipe the Mint Cream (Step by Step)
In a large bowl, whip 1 cup heavy cream until it forms soft peaks. Add 2 tablespoons powdered sugar, ¼ teaspoon mint extract, and a couple of drops of green food coloring. Beat again until stiff peaks form. Spoon the whipped cream into a piping bag fitted with a star or 1M tip.
Pipe decorative swirls along the top of the cheesecake—this not only makes it look gorgeous but adds a light, airy contrast to the rich chocolate ganache. Finish each swirl with an Andes mint for that bakery-style touch.
Step 7: Chill, Slice, and Serve (Final Step by Step)
Once decorated, chill the cheesecake again for about 15–30 minutes before slicing. For neat slices, dip a sharp knife in hot water and wipe it clean between cuts. Each slice will reveal a beautiful balance of mint-green filling, Oreo crust, and glistening chocolate topping.
Serve your Mint Chocolate Cheesecake chilled, and watch your guests’ eyes light up after the first bite. Whether you’re making it for a special occasion or just because you deserve it (you totally do!), this dessert is pure mint-chocolate bliss.
If you enjoyed this step-by-step cheesecake guide, you might also love our St. Patrick’s Day Brownie Trifle—another showstopper that’s festive, fun, and surprisingly simple to make.
What to Serve with Mint Chocolate Cheesecake
This cheesecake stands beautifully on its own, but if you’re feeling extra, try pairing it with hot coffee or mint hot cocoa for cozy vibes. For something refreshing, a scoop of vanilla or mint chocolate chip ice cream does wonders. During the holidays or St. Patrick’s Day, it pairs perfectly with other green-themed treats like Saint Patrick’s Day Puppy Chow or Shamrock Swirl Pie. If you want a savory contrast before dessert, check out Crockpot Honey BBQ Wings—sweet, sticky, and the perfect prelude to something rich and minty.
Key Tips for Making Mint Chocolate Cheesecake
- Room Temperature Ingredients: Always bring your cream cheese and eggs to room temp to get that creamy, lump-free filling.
- Avoid Overmixing: Mix just until combined—overmixing can add too much air, leading to cracks.
- Water Bath Magic: It may seem like extra work, but the water bath is your secret weapon for a silky-smooth texture.
- Patience Pays Off: Let the cheesecake chill fully before cutting; this helps it set perfectly.
- Decorate Before Serving: Add whipped cream and mints right before serving so everything looks and tastes fresh.
Storage and Reheating Tips for Mint Chocolate Cheesecake
Store leftovers in the fridge, covered loosely with plastic wrap, for up to five days. For longer storage, freeze individual slices (without whipped cream) by wrapping them tightly in plastic and placing them in an airtight container for up to two months. When ready to serve, thaw overnight in the fridge—never the microwave—to keep that creamy texture intact. If you want to refresh it slightly, let it sit at room temperature for about 15 minutes before enjoying.
FAQs
Can I use dark chocolate instead of milk chocolate? Absolutely! Dark chocolate will give the cheesecake a richer, slightly less sweet flavor.
Can I skip the food coloring? Yes! It’ll taste just as delicious—just less festive.
Do I need a water bath? Technically no, but if you want a crack-free top, it’s worth it.
Can I make it ahead? Definitely. This cheesecake tastes even better the next day.
Final Thoughts
Mint Chocolate Cheesecake is the kind of dessert that brings joy with every bite—cool, creamy, and bursting with chocolatey goodness. It’s indulgent without being overwhelming and elegant without being complicated. Perfect for celebrations or cozy nights in, this recipe is a guaranteed hit. So grab your mint extract, whip out your mixer, and let’s make dessert magic happen.
Visit our Pinterest for regular slow cooker recipe updates, or join our Facebook discussions where cooking fans exchange their favorite hearty meal ideas.
Print
Mint Chocolate Cheesecake
- Prep Time: 35 minutes
- Cook Time: 1 hour 20 minutes
- Total Time: 1 hour 55 minutes
- Yield: 12 slices 1x
- Category: Dessert
- Method: Baking
- Cuisine: American
Description
This vibrant Mint Chocolate Cheesecake is a dream for any chocolate mint lover, featuring a mint chocolate Oreo crust, a creamy green mint cheesecake filling with milk chocolate bits, making it the perfect festive treat for St. Patrick’s Day!
Ingredients
- Crust
- 14 Oreo cookies
- 8 mint Oreo cookies
- 4 tablespoons butter, melted
- Cheesecake Filling
- 24 ounces cream cheese, room temperature
- 1 1/4 cups granulated sugar
- 1/2 teaspoon vanilla extract
- 1 teaspoon mint extract
- 4 large eggs
- 1 cup sour cream
- 1/2 cup heavy cream
- 6 Hershey’s 1.55-ounce milk chocolate candy bars, chopped
- 2 to 4 drops green gel food coloring
- Ganache
- 3/4 cup milk chocolate chips
- 1/2 cup heavy cream
- Whipped Cream
- 1 cup heavy cream
- 2 tablespoons powdered sugar
- 1/4 teaspoon mint extract
- 2 to 3 drops green gel food coloring
- Andes Chocolate Mints, for garnish
Instructions
1. Preheat oven to 325 degrees Fahrenheit.
2. In a food processor, pulse the Oreo cookies until fine crumbs form.
3. Add the melted butter to the crumbs and pulse until combined.
4. Press the crumbs firmly into the bottom of a 9-inch springform pan.
5. Bake crust for 10 minutes, then remove from oven and let cool.
6. In a large bowl, beat cream cheese until creamy. Scrape down sides.
7. Add sugar and beat until incorporated. Scrape down sides.
8. Add vanilla extract, mint extract, and eggs one at a time, beating between each addition. Scrape down sides.
9. Add sour cream, heavy cream, and food coloring. Beat until combined and color is evenly distributed.
10. Stir in chopped chocolate.
11. Wrap bottom of springform pan with heavy foil and place in a larger pan. Add 1–2 inches of hot water around the cheesecake.
12. Spray the sides of the springform pan with nonstick spray.
13. Pour cheesecake batter over crust and smooth the top.
14. Bake for 1 hour 20 minutes or until center jiggles slightly like jello.
15. Turn off oven and crack door. Let cheesecake cool in oven.
16. Refrigerate for at least 4 hours, preferably overnight.
17. Make ganache by microwaving chocolate chips and heavy cream for 1 minute, stirring until smooth. Microwave another 30 seconds if needed.
18. Pour ganache over chilled cheesecake and chill for at least 30 minutes.
19. Beat heavy cream until soft peaks form.
20. Add powdered sugar, mint extract, and food coloring. Beat until stiff peaks form.
21. Pipe whipped cream swirls on top of cheesecake and garnish with Andes mints.
22. Slice, serve, and store in the fridge.
Notes
Nutrition information is provided as an estimate only.
Recipe time includes prep and baking time, but does not include cooling time. Please allow several hours for proper cooling time to prevent cracks in the cheesecake.
Nutrition
- Serving Size: 1 slice
- Calories: 682
- Sugar: 43g
- Sodium: 333mg
- Fat: 51g
- Saturated Fat: 29g
- Unsaturated Fat: 16g
- Trans Fat: 0.2g
- Carbohydrates: 52g
- Fiber: 1g
- Protein: 8g
- Cholesterol: 179mg