Braised Catalina Chicken is the absolute answer to those chaotic weeknights when you feel like you are running a marathon in flip-flops. We all know that mid-week slump where the kids are hungry, the fridge looks uninspiring, and you just want a meal that hugs you back. This recipe delivers exactly that with a sticky, savory-sweet glaze that makes your kitchen smell like a five-star bistro. Since I first tried this method, it has become a staple in my home because it requires so little effort for such a massive payoff in flavor. You can easily prep the chicken in minutes and let the oven do the heavy lifting while you catch up on a show or finally fold that mountain of laundry. This Braised Catalina Chicken is guaranteed to please even the pickiest eaters, turning a regular Tuesday into a mini celebration at the dining table. Because we use bone-in thighs, the meat stays incredibly juicy while the sauce transforms into a rich, lacquer-like coating that is simply irresistible.
What is Braised Catalina Chicken?
Braised Catalina Chicken is a comforting, soul-warming dish that features tender chicken thighs slow-cooked in a homemade version of the classic red dressing. While many old-school recipes simply dump a bottle of store-bought dressing over the meat, this version creates a sophisticated profile by balancing ketchup, honey, and apple cider vinegar. Braising is a cooking technique where you sear the meat at a high temperature first and then let it simmer in a small amount of liquid. This process breaks down the connective tissues in the chicken, making it fall-off-the-bone tender. The “Catalina” part refers to that iconic bright red, zesty, and sweet flavor profile we all remember from salad bars, but intensified through the magic of heat and caramelization. It’s a nostalgic trip for your taste buds, revamped for a modern kitchen that values fresh ingredients over bottled preservatives.
Reasons to Try Braised Catalina Chicken
You should definitely try Braised Catalina Chicken if you love meals that taste like you spent hours over the stove but actually took very little active work. First, the flavor balance is a total winner; it hits those sweet, salty, and tangy notes all at once, which is why kids usually devour it without a single complaint. Second, using chicken thighs makes this recipe very forgiving and budget-friendly, as they are harder to overcook than lean breasts. Additionally, this dish is a fantastic “set it and forget it” meal that fills your home with a mouth-watering aroma that beats any scented candle. It is also incredibly versatile, meaning you can swap the honey for brown sugar or add a bit more cayenne if your family likes a little kick. Finally, the leftovers are arguably even better the next day, as the flavors have more time to meld together in the fridge.
Ingredients Needed to Make Braised Catalina Chicken
- 6 bone-in skin-on chicken thighs: These provide the best flavor and remain moist during the long bake.
- 1 tablespoon olive oil: Just enough to get that skin perfectly crispy and golden.
- Salt and black pepper: Essential for seasoning the meat before it hits the pan.
- 1/2 cup ketchup: This acts as the thick, tomatoey base for our signature sauce.
- 1/4 cup apple cider vinegar: Adds the necessary tang to cut through the sweetness.
- 1/4 cup honey or brown sugar: This provides the sticky sweetness that kids love.
- 2 tablespoons Worcestershire sauce: Adds a deep, umami-rich complexity to the glaze.
- 1 tablespoon soy sauce: For a salty, savory depth that balances the sugar.
- 1 teaspoon onion powder: Provides a savory baseline without the texture of raw onions.
- 1/2 teaspoon garlic powder: Because everything tastes better with a little garlic.
- 1/2 teaspoon smoked paprika: This gives the sauce a subtle wood-fired flavor.
- Pinch of cayenne pepper: Entirely optional, but great if you want a tiny bit of heat.
Instructions to Make Braised Catalina Chicken – Step by Step
Step 1: Preheat and Sear for Maximum Flavor
First, you need to get your oven ready by preheating it to 350°F so it’s nice and hot when the chicken is ready to go in. Take a moment to pat your chicken thighs completely dry with paper towels; this is a pro tip because moisture is the enemy of a good sear. Once they are dry, season them generously with salt and pepper on both sides to build layers of flavor from the start. Heat your olive oil in a large Dutch oven or an oven-safe heavy skillet over medium heat until it shimmers. Carefully place the chicken skin-side down in the hot oil, and let them sizzle for about 5 minutes without moving them. You want that skin to turn a gorgeous, deep golden brown before you flip them over for another 2 minutes on the other side. After searing, move the chicken to a plate for a moment, leaving those tasty browned bits in the pan to enrich the sauce later.
Step 2: Whisking the Signature Sauce
While your chicken is resting, it is time to assemble the star of the show: the Catalina sauce. In a medium mixing bowl, combine the ketchup, apple cider vinegar, honey, Worcestershire sauce, soy sauce, and all your dry spices. Grab a whisk and blend everything together until the mixture is completely smooth and looks like a vibrant, ruby-red glaze. I always recommend taking a quick taste at this point to see if it makes your heart happy; you might want an extra splash of vinegar for tang or a bit more honey if you have a sweet tooth. This Step by Step process ensures that the spices are fully incorporated so you don’t end up with any clumps in your final dish.
Step 3: Setting Up the Braise
Now comes the part where we bring the elements together to create magic in the pan. Pour about half of your freshly made sauce directly into the bottom of the Dutch oven, spreading it out to create a flavorful bed for the meat. Carefully nestle the chicken thighs back into the pan, making sure to keep the skin side facing up so it can stay somewhat crisp during the first part of the bake. Pour the remaining half of the sauce over the top of the chicken, ensuring each piece is well-coated in that delicious red glaze. Cover the pot tightly with a lid or a heavy layer of foil to trap all that wonderful moisture inside, which is the secret to a perfect braise.
Step 4: The Oven Transformation
Slide your covered pot into the center of the oven and let it bake for about 45 minutes, allowing the chicken to become incredibly tender. Once the timer goes off, remove the lid or foil—this is a crucial Step by Step move because it allows the liquid to reduce and thicken. Bake it uncovered for another 20 to 25 minutes, watching as the sauce transforms into a thick, syrupy glaze that clings to the meat. You will see the edges of the sauce starting to bubble and caramelize, which adds a fantastic depth of flavor that you just can’t get from stovetop cooking alone.
Step 5: The Grand Finale and Serving
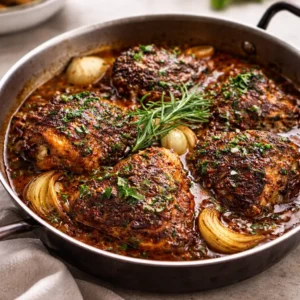
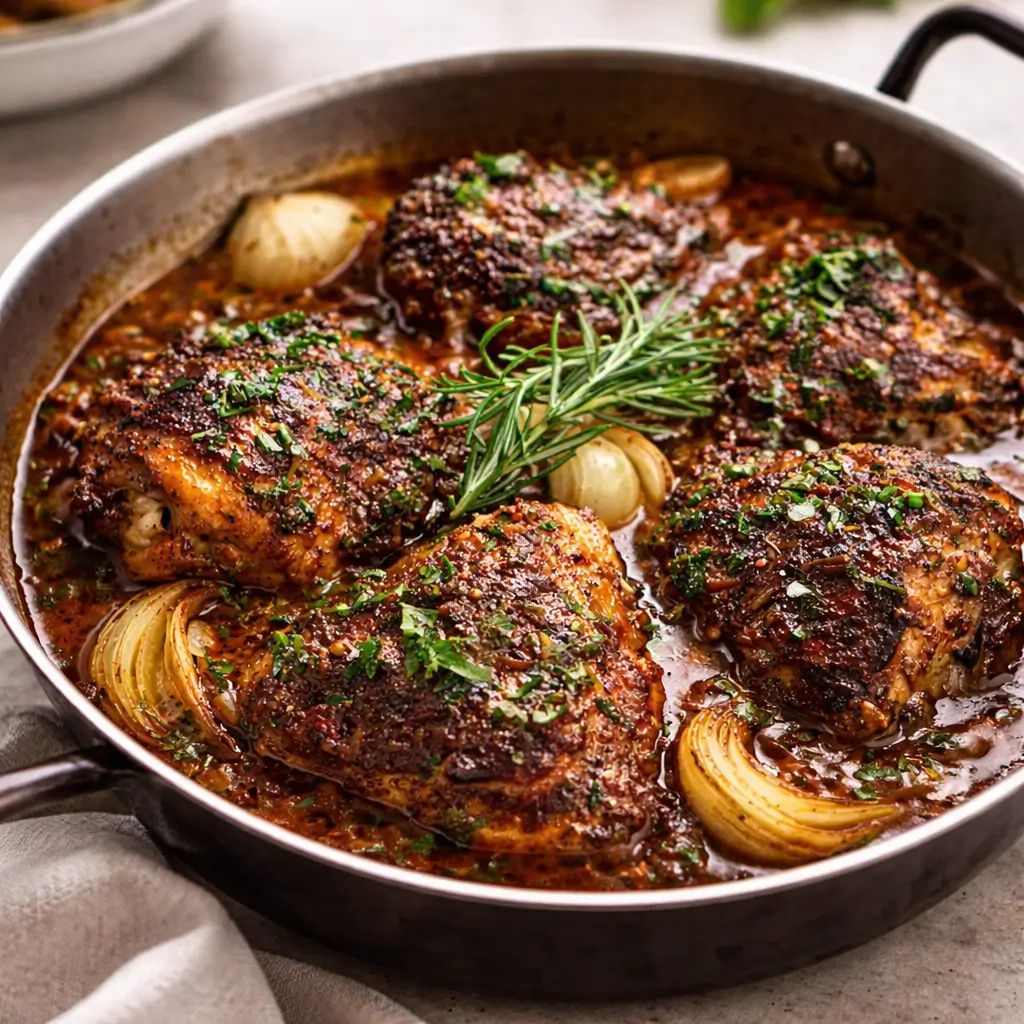
Once the chicken is tender and the sauce is dark and glossy, take the pan out of the oven and let it rest for five minutes. This short wait allows the juices to redistribute within the meat, ensuring every bite is succulent. Serve the thighs hot, making sure to use a large spoon to drizzle plenty of that extra pan sauce over each portion. If you want to feel a bit fancy, a quick sprinkle of fresh chopped parsley adds a beautiful pop of green against the deep red chicken. It is a stunning, effortless meal that looks like it belongs in a magazine but feels like home on a plate.
What to Serve with Braised Catalina Chicken
To make the most of that incredible sauce, you definitely want to serve this chicken with something that can soak up every drop. A mound of fluffy white rice or buttery mashed potatoes is the classic choice, as they provide a neutral base for the bold flavors of the glaze. If you want to keep things a bit lighter, a simple quinoa salad or even some roasted cauliflower works beautifully. For greens, a side of steamed broccoli or roasted green beans provides a nice crunch and a healthy balance to the richness of the meat. I also love serving this with a crusty piece of sourdough bread to wipe the plate clean because you won’t want to leave even a smear of that Catalina sauce behind.
Key Tips for Making Braised Catalina Chicken
One of the best tips for success is to avoid overcrowding the pan during the searing phase; if the thighs are too close together, they will steam instead of brown. If you have a smaller pan, just sear them in two batches to ensure that perfect golden skin. Also, if you find your sauce is a bit too thin at the end, you can simmer it on the stovetop for a few minutes after removing the chicken to thicken it further. If you are watching your sugar intake, you can substitute the honey with a sugar-free maple syrup or a keto-friendly sweetener, though the caramelization might differ slightly. Lastly, don’t skip the searing step! That initial browning provides a massive amount of flavor that the oven simply cannot replicate on its own.
Storage and Reheating Tips for Braised Catalina Chicken
If you are lucky enough to have leftovers, they store beautifully in an airtight container in the refrigerator for up to four days. The flavors actually continue to develop, making the chicken even more delicious for lunch the next day. When you are ready to reheat, I suggest doing so in the oven at 325°F covered with foil to prevent the chicken from drying out. You can also use the microwave for a quick fix, but the oven helps maintain the integrity of the sauce much better. If the sauce has thickened too much in the fridge, just add a tiny splash of water or chicken broth before heating to loosen it back up. This dish also freezes well; just make sure it’s completely cooled before putting it in a freezer-safe bag for up to three months.
FAQs
Can I use chicken breasts instead of thighs? Yes, you can, but keep in mind that breasts cook much faster and can dry out easily. I recommend reducing the initial baking time by about 10-15 minutes and checking the internal temperature to ensure it stays juicy.
What if I don’t have apple cider vinegar? You can use white wine vinegar or even red wine vinegar as a substitute. The flavor will be slightly different, but it will still provide that necessary acidic kick to balance the honey.
Is this recipe spicy? Not really! The tiny pinch of cayenne is optional and only adds a very subtle warmth. Without it, the dish is strictly sweet and tangy, making it very kid-friendly.
Do I have to use a Dutch oven? No, any oven-safe skillet or even a regular baking dish will work. If you use a baking dish, just sear the chicken in a regular pan first and then transfer everything to the dish for the oven portion.
Final Thoughts
Making Braised Catalina Chicken is a wonderful way to bring excitement back to your dinner routine without adding stress to your life. It is a simple, honest meal that celebrates the beauty of slow cooking and bold, familiar flavors. Whether you are cooking for a hungry family or just meal-prepping for the week ahead, this recipe offers a reliable and delicious result every single time. It reminds us that good food doesn’t have to be complicated or expensive to be deeply satisfying. So, grab your favorite skillet, whisk up that tangy sauce, and get ready to enjoy a dish that will quickly become a new family favorite. You deserve a dinner that is as easy to make as it is delightful to eat, and this chicken truly hits the mark.
Print
Braised Catalina Chicken
- Prep Time: 10 minutes
- Cook Time: 1 hour 15 minutes
- Total Time: 1 hour 25 minutes
- Yield: 4 servings 1x
- Category: Dinner
- Method: Braising
- Cuisine: American
- Diet: Gluten Free
Description
Braised Catalina Chicken features juicy, golden-seared chicken thighs baked in a tangy, sweet, and savory Catalina-style sauce until tender and caramelized.
Ingredients
For the Chicken:
- 6 bone-in, skin-on chicken thighs
- 1 tablespoon olive oil
- Salt and black pepper to taste
For the Catalina Sauce:
- 1/2 cup ketchup
- 1/4 cup apple cider vinegar
- 1/4 cup honey or brown sugar
- 2 tablespoons Worcestershire sauce
- 1 tablespoon soy sauce
- 1 teaspoon onion powder
- 1/2 teaspoon garlic powder
- 1/2 teaspoon smoked paprika
- Pinch of cayenne pepper (optional)
Instructions
1. Preheat oven to 350°F (175°C).
2. Pat chicken dry and season with salt and pepper. Heat olive oil in a Dutch oven over medium heat and sear chicken skin side down for 4-5 minutes until golden. Flip and cook 2 minutes more, then remove from pan.
3. In a bowl, whisk together ketchup, apple cider vinegar, honey or brown sugar, Worcestershire sauce, soy sauce, onion powder, garlic powder, smoked paprika, and cayenne pepper until smooth.
4. Pour half of the sauce into the Dutch oven. Return chicken to the pan skin side up and pour remaining sauce over the top.
5. Cover and bake for 45 minutes.
6. Remove cover and bake an additional 20-25 minutes until sauce thickens and chicken is tender and caramelized.
7. Serve hot with sauce spooned over the chicken and garnish with chopped parsley if desired.
Notes
Adjust sweetness or tanginess of the sauce to taste before baking.
For extra crisp skin, broil for a few minutes at the end of cooking.
Pairs well with rice, mashed potatoes, or roasted vegetables.
Store leftovers in the refrigerator for up to 3 days.
Nutrition
- Serving Size: 1-2 thighs
- Calories: 420
- Sugar: 18g
- Sodium: 720mg
- Fat: 22g
- Saturated Fat: 6g
- Unsaturated Fat: 14g
- Trans Fat: 0g
- Carbohydrates: 20g
- Fiber: 0g
- Protein: 35g
- Cholesterol: 140mg