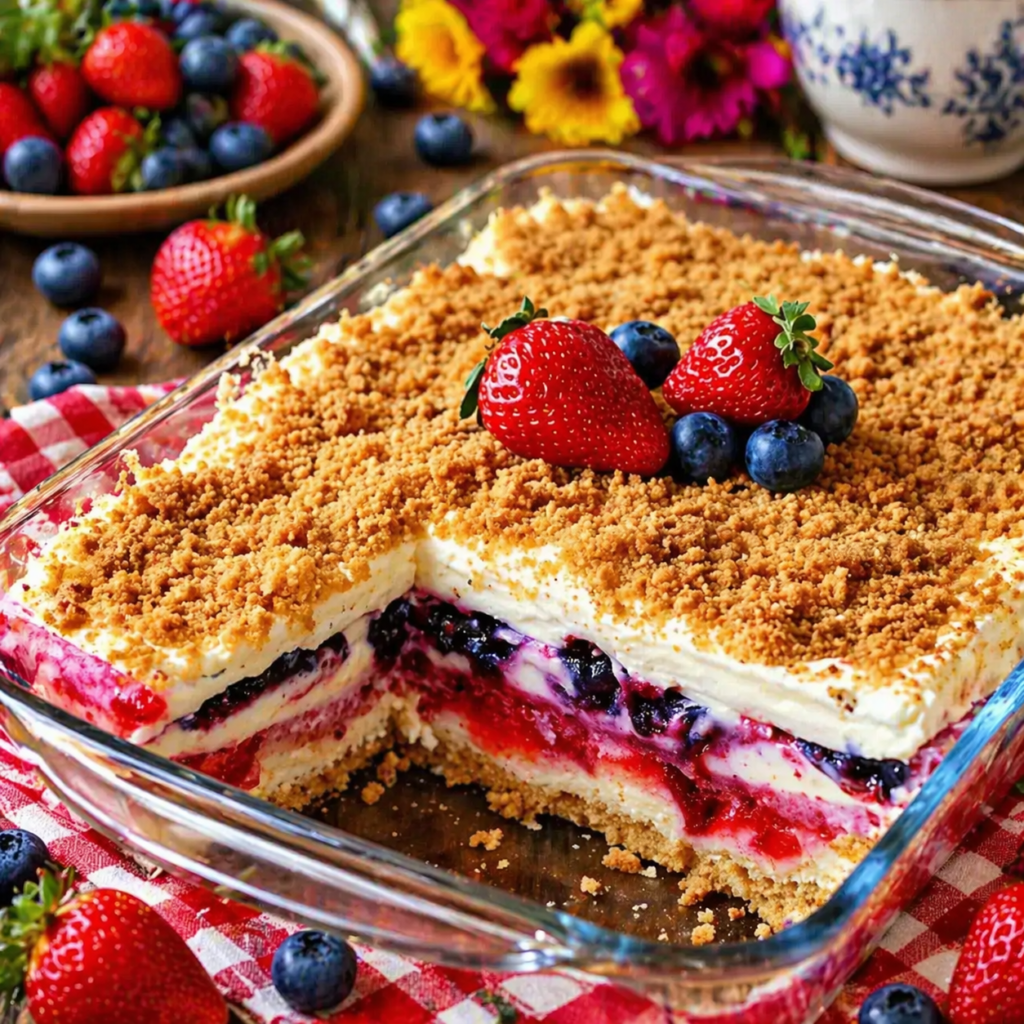
Red, White & Blue Mixed Berry Yum Yum is the absolute best way to win over any crowd at your next summer cookout. Because let’s be honest, we’ve all been there—standing in the kitchen with a million things to do, kids running around, and a potluck starting in two hours. You need something that looks like a million bucks but doesn’t require you to turn on the oven and sweat through your favorite shirt. This Red, White & Blue Mixed Berry Yum Yum is a total lifesaver for busy moms and professionals who want a reliable, show-stopping treat without the drama of baking. It is a terrific choice for the 4th of July, Memorial Day, or any Tuesday when you just need a win. The magic of this dish lies in its simple layers and that gorgeous patriotic pop of color. You get a buttery, salty-sweet graham cracker crust followed by a fluffy, cloud-like cream cheese layer that hits all the right notes. It is an innovative twist on the classic “lasagna” style dessert that feels both nostalgic and fresh. Since it is a no-bake wonder, you won’t have to worry about a sinking cake or burnt edges. Just pure, creamy bliss that is guaranteed to disappear from the table in minutes. This Red, White & Blue Mixed Berry Yum Yum is truly the secret weapon your recipe box has been waiting for.
What is Red, White & Blue Mixed Berry Yum Yum?
This dessert is a classic American “yum yum” or “lush” cake that focuses on layers of creamy goodness and fruit. Traditionally, these desserts are known for their ease and the fact that they are served cold, making them perfect for hot summer days. The Red, White & Blue Mixed Berry Yum Yum specifically uses strawberry and blueberry fillings to create those iconic patriotic stripes. It’s essentially a cross between a cheesecake and a trifle, but much easier to assemble than either of those. You have a sturdy graham cracker base that provides a nice crunch against the silky smooth cream. It is a versatile dish that fits right in at a fancy dinner or a casual backyard barbecue. Everyone loves a good layered dessert because you get a little bit of everything in every single bite.
Reasons to Try Red, White & Blue Mixed Berry Yum Yum
You should absolutely make this because it is one of the most reliable recipes in existence. First off, it is a big crowd-pleaser that appeals to both kids and adults. Even your pickiest eaters will find it hard to resist the combination of whipped cream and berries. Secondly, the prep work is incredibly fast, which is a huge deal when you are juggling a million tasks. It’s also a great way to show off your patriotic spirit without having to buy expensive decorations. The red and blue berries do all the heavy lifting for you. Plus, because you make it ahead of time, you can actually enjoy your party instead of being stuck in the kitchen until the last second. It is a stress-free, high-reward recipe that makes you look like a pro.
Ingredients Needed to Make Red, White & Blue Mixed Berry Yum Yum
- 2 1/2 cups graham cracker crumbs: These provide the foundation for your buttery, delicious crust.
- 12 tbsp unsalted butter, melted: This acts as the glue that holds your crumbs together in a perfect snap.
- 2 packages cream cheese, softened (8 oz each): This is where that rich, tangy flavor comes from.
- 1 cup confectioners’ sugar: It adds just the right amount of sweetness to the cream layer without being grainy.
- 4 cups heavy whipping cream, chilled: This makes the filling light, airy, and absolutely mammoth in size.
- 2 tsp vanilla extract, divided: Use the good stuff here; it makes a huge difference in the final taste.
- 6 tbsp granulated sugar: This helps stabilize your whipped cream and adds a touch of sweetness.
- 1 can strawberry pie filling (21 oz): This gives you that bright, bold red layer and sweet fruit flavor.
- 1 can blueberry pie filling (21 oz): This provides the deep blue contrast and a nice jammy texture.
Instructions to Make Red, White & Blue Mixed Berry Yum Yum – Step by Step
Step 1: Building the Golden Foundation
The first move in your Red, White & Blue Mixed Berry Yum Yum journey is creating that perfect crust. Start by grabbing your 9×13-inch baking dish and a large mixing bowl. Toss in your graham cracker crumbs and pour that melted butter right over them. Give it a good stir until it looks like wet sand. Now, here is a little secret: take about 3 tablespoons of that mixture and set it aside in a small bowl. You’ll use that later for a beautiful garnish. Take the rest of the buttery crumbs and press them firmly into the bottom of your dish. I like to use the bottom of a measuring cup to really pack it down so it doesn’t crumble when you slice it. This Step by Step process ensures your base is sturdy enough to hold all those heavy, delicious layers. Once it’s nice and even, pop it in the fridge while you work on the next part.
Step 2: Crafting the Creamy Heart
Now, let’s get into the soul of the dessert. In another bowl, take your softened cream cheese and hit it with the confectioners’ sugar and half of your vanilla. Use your electric mixer to beat it until it is completely smooth. You want zero lumps here, so make sure that cream cheese is truly soft before you start. This is the part of the Step by Step guide where patience pays off. Once it looks like silk, set it aside. In a separate cold bowl, pour in your heavy whipping cream, granulated sugar, and the rest of the vanilla. Whip it on high until you get stiff peaks—that means when you lift the beaters, the cream stands up straight. Now, gently fold about half of that whipped cream into your cream cheese mixture. Be careful not to stir too hard; you want to keep all that air inside so it stays fluffy. Following this Step by Step method keeps your dessert from feeling heavy or dense.
Step 3: The First Layer of Joy
It is time to start the assembly line! Pull your crust out of the fridge. Take about one-third of that fluffy cream mixture and spread it gently over the graham crackers. Use a spatula to get it into the corners. Once that’s done, grab your can of strawberry pie filling. Carefully spoon it over the cream layer. Try not to swirl it in; you want distinct layers so it looks amazing when you cut into it. This Step by Step approach is what gives the dish its “wow” factor. The red against the white is already looking festive, isn’t it?
Step 4: Adding the Patriotic Blue
Repeat the process for the next layer of your Red, White & Blue Mixed Berry Yum Yum. Spread another third of the cream mixture over the strawberries. Again, be gentle so you don’t disturb the fruit underneath. Next, open that can of blueberry pie filling and spread it over the cream. This adds that deep, rich blue that makes this dessert so perfect for a holiday. This Step by Step layer-building is actually quite therapeutic. You can see the masterpiece coming together right before your eyes.
Step 5: The Grand Finale and Chilling
For the final touch, spread the last of your cream mixture over the blueberries. Smooth it out as best as you can. Remember those 3 tablespoons of buttery crumbs we saved earlier? Sprinkle them all over the top like a little bit of edible fairy dust. Now, here is the hardest part of the whole Step by Step process: the wait. You must cover this dish and put it in the fridge for at least 12 hours. I know, I know—you want to dive in now. But this time allows the layers to set and the crust to soften just enough to be perfect. If you try to cut it too soon, it might be a bit messy. Trust the process, and you’ll be rewarded with a spectacular treat.
What to Serve with Red, White & Blue Mixed Berry Yum Yum
This dessert is a powerhouse all on its own, but you can definitely pair it with a few things to make the experience even better. A cold glass of lemonade or a sparkling berry punch is a fantastic way to wash down the creamy layers. If you are serving this at a barbecue, it goes beautifully after a meal of grilled chicken, burgers, or even a spicy rack of ribs. The coolness of the cream acts as a perfect palate cleanser. You could also serve it alongside some fresh fruit skewers if you want to lean into the healthy-ish vibe. Honestly, a simple cup of coffee in the evening with a slice of this yum yum is pure bliss.
Key Tips for Making Red, White & Blue Mixed Berry Yum Yum
To get the best results, always use full-fat cream cheese. The low-fat stuff just doesn’t have the same stability or richness. Also, make sure your heavy cream is ice cold before you start whipping it; this helps it reach those stiff peaks much faster. If you want to get really fancy, you can add a few fresh blueberries or sliced strawberries on top of the final layer for a fresh pop of color. Another pro tip: wipe your knife clean between every slice when you serve it. This keeps the red and blue fillings from smearing into the white cream, making every piece look professional and clean. It’s a simple trick that makes a huge difference in presentation.
Storage and Reheating Tips Red, White & Blue Mixed Berry Yum Yum
Since this is a no-bake cream-based dessert, you should never reheat it. It is meant to be enjoyed cold. If you have leftovers, keep them in the baking dish and cover it tightly with plastic wrap or a lid. It will stay fresh and delicious in the refrigerator for up to 3 to 4 days. In fact, some people think it tastes even better on day two once all the flavors have had a chance to really get to know each other. I wouldn’t recommend freezing this dish, as the texture of the pie filling and the whipped cream can change and become a bit watery once it thaws. Just keep it chilled and enjoy it while it’s fresh!
FAQs
Can I use whipped topping instead of heavy cream? Yes, you can substitute a 16 oz tub of whipped topping if you are in a major rush. It will be a bit sweeter and less rich, but it still works great.
Can I use fresh fruit instead of pie filling? You can, but you’ll need to cook the fruit down with some sugar and cornstarch first to get that jammy consistency. The canned filling is a great shortcut for this specific recipe.
Is there a way to make this gluten-free? Absolutely! Just use gluten-free graham cracker crumbs or crushed gluten-free vanilla wafers for the crust. The rest of the ingredients are naturally gluten-free.
Final Thoughts
Making a Red, White & Blue Mixed Berry Yum Yum is a sure-fire way to bring a smile to everyone’s face. It is a simple, beautiful, and absolutely delicious way to celebrate summer and spend more time with the people you love. Whether you are a seasoned pro in the kitchen or a total beginner, this recipe is easy to master and even easier to eat. So, go ahead and grab those ingredients, follow the steps, and get ready for the compliments to start rolling in. This Red, White & Blue Mixed Berry Yum Yum is about to become your new favorite tradition.
Print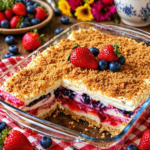
Red, White & Blue Mixed Berry Yum Yum: The Ultimate Festive Dessert
- Prep Time: 30 minutes
- Cook Time: 0 minutes
- Total Time: 12 hours 30 minutes
- Yield: 12 servings 1x
- Category: Dessert
- Method: No-Bake
- Cuisine: American
- Diet: Vegetarian
Description
A festive, multi-layered no-bake dessert featuring patriotic colors, a buttery graham cracker crust, and a fluffy cream cheese and whipped cream center.
Ingredients
- 2 1/2 cups graham cracker crumbs
- 12 tbsp unsalted butter, melted
- 2 packages cream cheese, softened (8 oz each)
- 1 cup confectioners’ sugar
- 4 cups heavy whipping cream, chilled
- 2 tsp vanilla extract, divided
- 6 tbsp granulated sugar
- 1 can strawberry pie filling (21 oz)
- 1 can blueberry pie filling (21 oz)
Instructions
1. Combine graham cracker crumbs and melted butter. Reserve 3 tablespoons for topping, then firmly press the rest into a 9×13-inch dish.
2. Beat softened cream cheese, confectioners’ sugar, and 1 teaspoon vanilla until smooth and creamy.
3. In a separate bowl, whip heavy cream, granulated sugar, and remaining vanilla to stiff peaks. Gently fold into the cream cheese mixture.
4. Spread one-third of the cream mixture over the crust, then gently spread the strawberry pie filling on top.
5. Spread another third of the cream mixture over the strawberry layer, then top gently with the blueberry pie filling.
6. Top with the remaining cream mixture and sprinkle with the reserved graham cracker crumbs.
7. Refrigerate overnight, at least 12 hours, before slicing and serving.
Notes
Use premium strawberry and blueberry pie fillings for more whole fruit in every bite.
This dessert is best made 12–24 hours ahead so the layers fully set.
You can substitute 16 oz whipped topping for the homemade whipped cream if needed, though the flavor will be less rich.
Nutrition
- Serving Size: 1 piece
- Calories: 385 kcal
- Sugar: 25g
- Sodium: 220mg
- Fat: 29g
- Saturated Fat: 18g
- Unsaturated Fat: 9g
- Trans Fat: 0.5g
- Carbohydrates: 29g
- Fiber: 1g
- Protein: 4g
- Cholesterol: 85mg