Amish Rhubarb Jam is the kind of recipe that instantly transports you back to a simpler time, standing in a sun-drenched farmhouse kitchen where the air smells like bubbling fruit and sugar. If you have ever felt overwhelmed by the thought of canning, let me tell you—this recipe is your new best friend. It is incredibly forgiving, and that signature tartness from the rhubarb paired with a punch of cherry flavor is purely addictive. Whether you are a seasoned pro or a total newbie, making this heritage treat is a rewarding way to preserve the season’s best produce. We are going to walk through every step together, ensuring your pantry is stocked with jars of ruby-red goodness that taste like a warm hug on a piece of toast. Amish Rhubarb Jam truly highlights how a few humble ingredients can create something spectacular for your family to enjoy.
What is Amish Rhubarb Jam?
Amish Rhubarb Jam is a traditional, pectin-free preserve that relies on the natural structure of rhubarb and the help of flavored gelatin to achieve its perfect spreadable consistency. Unlike many modern jams that can be finicky or require precise chemistry, this version is rooted in the practical, “make-do” spirit of Amish cooking. It typically features diced rhubarb stalks simmered with sugar and often includes crushed pineapple for a tropical sweetness that balances the rhubarb’s natural zing. The addition of cherry gelatin not only helps the jam set beautifully but also gives it a vibrant, jewel-toned color that looks stunning in a glass jar. It is a staple in many rural American households, cherished for its unique sweet-and-sour profile that stands out from your standard strawberry or grape varieties.
Reasons to Try Amish Rhubarb Jam
If you are looking for a project that offers a high reward for very little stress, this is it. First off, it is a fantastic way to use up a backyard rhubarb harvest that might otherwise go to waste. Rhubarb grows like wildfire in many parts of the country, and there are only so many pies one person can bake! Secondly, the flavor is a total crowd-pleaser; it has a sophisticated tang that adults love, but the cherry and pineapple notes make it sweet enough for even the pickiest kids. This jam also makes for a thoughtful, “wow-factor” gift. Tying a bit of twine and a handwritten label around a jar of homemade Amish Rhubarb Jam says “I care about you” much better than anything you could grab at the grocery store. Plus, since it uses simple stovetop methods, you don’t need a basement full of specialized equipment to get started.
Ingredients Needed to Make Amish Rhubarb Jam
Gathering your supplies is the first step toward success, and you likely have most of these in your pantry already. Here is what you will need:
- 4 cups diced rhubarb: You can use fresh stalks from the garden or grab a bag of frozen rhubarb. If you go the frozen route, just make sure to thaw it and drain the extra liquid so your jam isn’t too runny.
- 4 cups granulated sugar: This might seem like a lot, but it is essential for preservation and balancing the tartness. If you prefer a bit more “zing,” you can scale this back to 2 cups.
- 1 small can (8 oz) crushed pineapple: Don’t drain this! The juice provides the necessary acidity and moisture to help the rhubarb break down.
- 1 package (3 oz) cherry-flavored gelatin: This is the “secret” ingredient that ensures a foolproof set and a gorgeous red hue.
Instructions to Make Amish Rhubarb Jam – Step by Step
Ready to get cooking? Follow this Step by Step guide to ensure your jam turns out perfectly every single time. We will take it slow so you feel confident at every turn of the wooden spoon.
Step 1: Prepare Your Rhubarb with Care
The very first thing you need to do in this Step by Step process is get that rhubarb ready for its transformation. Wash your stalks thoroughly under cool water to remove any garden dirt. Since rhubarb leaves are actually toxic, make sure you have trimmed them off completely and discarded them. Slice the stalks into small, uniform half-inch pieces. Keeping the size consistent helps the fruit break down evenly in the pot, which is a key part of our Step by Step journey toward a smooth texture.
Step 2: Dissolve the Sugar and Soften the Fruit
Now, toss your diced rhubarb and the granulated sugar into a large, heavy-bottomed saucepan. Turn the heat to medium and start stirring. You will notice the sugar looks dry at first, but as the heat does its work, the rhubarb will release its juices and create a thick syrup. This part of the Step by Step instructions requires a little patience; keep stirring frequently for about 15 to 20 minutes. You want the rhubarb to become completely soft and the sugar to be fully dissolved before moving forward.
Step 3: Add the Pineapple for a Sweet Twist
Once your rhubarb is nice and mushy, it is time for the next Step by Step move: stir in the entire can of crushed pineapple along with its juice. The pineapple adds a wonderful dimension of flavor that cuts through the tartness. Let this mixture simmer for another 3 minutes. This short burst of extra cooking helps the pineapple integrate with the rhubarb syrup, ensuring every spoonful of your finished jam has a balanced, fruity profile.
Step 4: The Gelatin Finale
Remove your saucepan from the heat entirely—this is a crucial Step by Step detail! Sprinkle the cherry-flavored gelatin over the hot fruit mixture and stir vigorously. You want to make sure every little granule of gelatin dissolves completely so you don’t end up with any lumps. As the mixture cools later, this gelatin is what will transform your liquid fruit into a thick, spreadable jam. Watching the color turn into that deep, brilliant red is the most satisfying part of the whole Step by Step process.
Step 5: Fill Your Jars and Seal the Deal
While the jam is still piping hot, carefully ladle it into sterilized jars. Leave about a 1/4 inch of “headspace” at the top—that is just the fancy canning term for the gap between the jam and the lid. Wipe the rims of the jars with a clean, damp cloth to ensure no sticky residue interferes with the seal. Apply your lids and bands snugly. To make your jam shelf-stable, process the jars in a boiling water bath for 10 minutes. This final Step by Step hurdle ensures your hard work stays fresh for months to come.
What to Serve with Amish Rhubarb Jam
The versatility of this jam is honestly legendary. The most classic way to enjoy it is slathered over a warm, buttered biscuit or a piece of thick-cut sourdough toast. However, do not stop there! It is an incredible topping for a bowl of plain Greek yogurt or a scoop of vanilla bean ice cream. If you are feeling a bit adventurous, try using it as a glaze for roast pork or grilled chicken; the sweetness and acidity pair beautifully with savory meats. It also makes a killer addition to a charcuterie board, sitting right alongside some sharp cheddar cheese or creamy brie.
Key Tips for Making Amish Rhubarb Jam
To get that professional finish, keep a few things in mind. First, always use a heavy-bottomed pot to prevent the sugar from scorching at the bottom. Second, if you aren’t sure if your jam is thick enough, try the “plate test.” Put a small saucer in the freezer before you start. When you think the jam is ready, drop a spoonful onto the cold plate. Give it a minute, then push it with your finger; if it wrinkles, it is set! Finally, avoid the temptation to double the batch in one pot. Jams cook better in smaller quantities where the heat can reach everything evenly, ensuring a consistent set.
Storage and Reheating Tips Amish Rhubarb Jam
If you followed the water bath canning method, your jars will stay happy in a cool, dark pantry for up to a year. Once you pop that seal, though, it has to live in the refrigerator, where it will stay fresh for about three to four weeks. If you didn’t want to deal with canning and just made “refrigerator jam,” it needs to go straight into the fridge once it cools. Should the jam get a little too firm in the fridge, you can easily soften it by letting it sit at room temperature for 15 minutes or giving it a very quick 5-10 second zap in the microwave (just make sure it’s in a microwave-safe dish, not the metal-lidded jar!).
FAQs
Can I use different gelatin flavors? Absolutely! While cherry is the traditional choice for that deep red color, strawberry or raspberry gelatin works beautifully too. It will slightly change the flavor profile but the “set” will be just as good.
Do I have to use the pineapple? While the pineapple adds great texture and helps with the acidity, you can leave it out if you aren’t a fan. Just be aware that the jam might be slightly more tart and have a different consistency.
My jam didn’t set, what happened? Sometimes if the rhubarb wasn’t cooked long enough to release its juices, or if it was overcooked to the point of breaking down the natural pectins, it might stay a bit runny. Don’t worry! It still tastes great as a syrup over pancakes.
Final Thoughts
Amish Rhubarb Jam is more than just a topping; it is a delicious piece of culinary history that you can create right in your own kitchen. This recipe proves that you don’t need complicated chemicals or hours of intense labor to produce something that tastes far better than any store-bought alternative. By following this guide, you have learned a foolproof way to capture the fleeting flavors of the season. I hope these jars bring a bit of joy to your morning routine or make a friend’s day when you share a jar. There is something truly special about the “sweet and tangy” magic of this heritage recipe, and I can’t wait for you to take that first delicious bite.
Print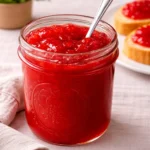
Amish Rhubarb Jam: A Sweet & Tangy Heritage Recipe
- Prep Time: 15 minutes
- Cook Time: 20 minutes
- Total Time: 35 minutes
- Yield: About 4 half-pint jars 1x
- Category: Jam & Preserves
- Method: Stovetop + Water Bath Canning
- Cuisine: American, Amish
- Diet: Vegetarian
Description
Discover how to make traditional Amish Rhubarb Jam with this easy, step-by-step recipe. Sweet, tangy, and preservative-free—perfect for beginners and seasoned canners alike.
Ingredients
- 4 cups diced rhubarb (fresh or frozen; thaw and drain if frozen)
- 4 cups granulated sugar (can be reduced to 2 cups for less sweetness)
- 1 can (8 oz) crushed pineapple (with juice)
- 1 package (3 oz) cherry-flavored gelatin
Instructions
1. Wash and dice the rhubarb into small pieces.
2. In a large saucepan, combine rhubarb and sugar. Cook over medium heat, stirring frequently, until the sugar dissolves and the rhubarb softens (about 15–20 minutes).
3. Stir in the crushed pineapple with its juice and continue cooking for 3 minutes.
4. Remove the saucepan from heat and stir in the cherry gelatin until fully dissolved.
5. Ladle the hot jam into sterilized jars, leaving about 1/4 inch of headspace.
6. Wipe jar rims clean, apply lids and bands, and process in a boiling water bath for 10 minutes.
7. Remove jars and let cool on a towel. Check seals once cooled and store in a cool, dark place.
Notes
Ensure jars and lids are properly sterilized to prevent contamination.
To test if jam has set, place a spoonful on a chilled plate; if it wrinkles when pushed, it is ready.
Avoid overcooking, as it can break down the pectin and prevent proper setting.
Nutrition
- Serving Size: 1 tablespoon
- Calories: 52
- Sugar: 13g
- Sodium: 1mg
- Fat: 0.1g
- Saturated Fat: 0.01g
- Unsaturated Fat: 0.09g
- Trans Fat: 0g
- Carbohydrates: 13g
- Fiber: 0.3g
- Protein: 0.1g
- Cholesterol: 0mg