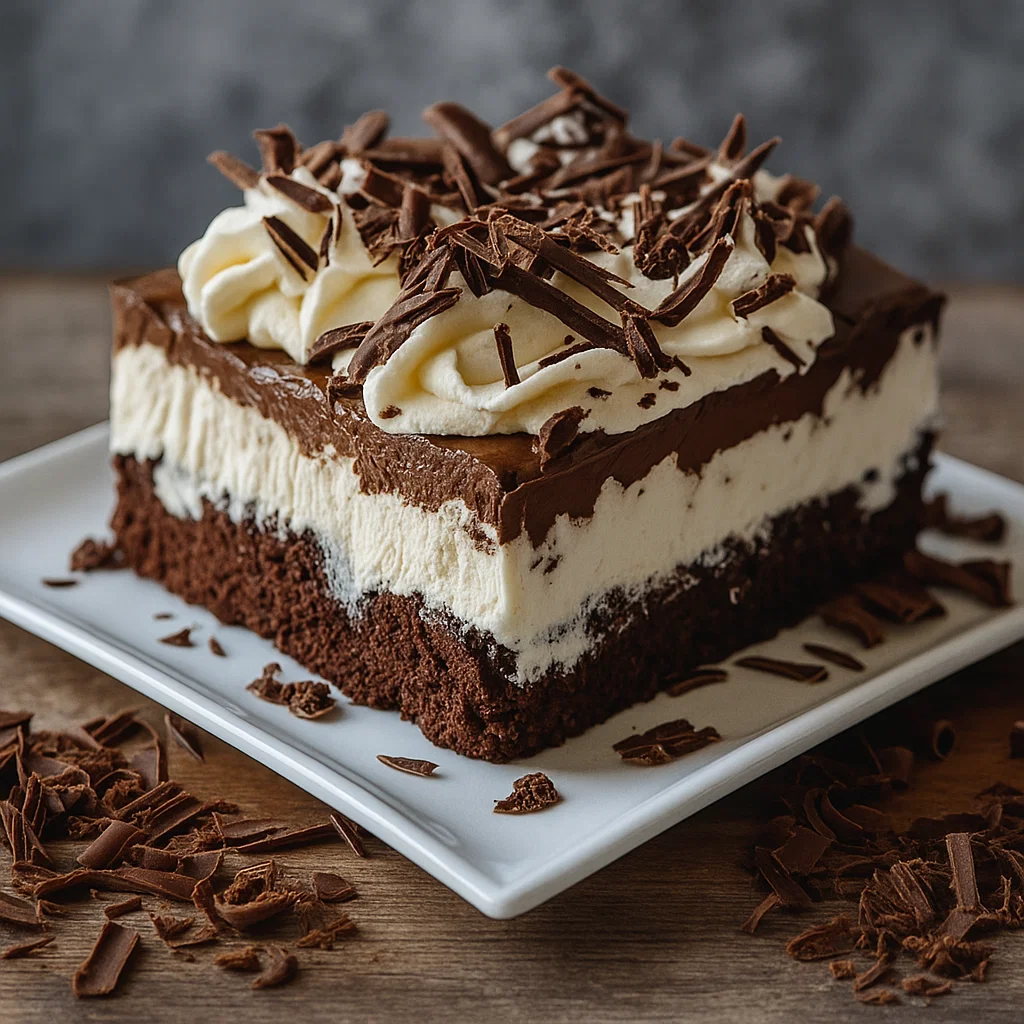
Brownie Refrigerator Cake is the dessert you pull out when you want everyone at the table to think you spent hours baking—but really, your fridge did all the work. Picture this: a fudgy brownie base layered with sweet cream cheese filling, silky pudding, and fluffy whipped topping. It’s rich, cold, and every bite feels like a hug from your favorite chocolate bar. This Brownie Refrigerator Cake isn’t just another no-bake dessert—it’s the kind of treat that makes you close your eyes for a second longer after that first bite. Whether it’s for a potluck, a family dinner, or a “just because” indulgence, this cake will earn you compliments (and probably a few recipe requests).
Table of Contents
What is Brownie Refrigerator Cake?
Brownie Refrigerator Cake is a cool, layered dessert that combines the best parts of a traditional brownie with the creamy luxury of a pudding trifle. Instead of baking layers, you assemble them—starting with a brownie base, followed by a sweet cream cheese mixture, pudding, and whipped topping. The magic happens in the fridge, where the layers meld together into a smooth, sliceable dream. This dessert takes minimal effort but delivers maximum reward. Think of it as your brownie’s glow-up moment—rich, chilled, and impossibly satisfying. If you’ve ever loved desserts like Boston Cream Pie Cookies or Choco Cheesecake Cookie Bites, you’ll fall head over heels for this one.
Reasons to Try Brownie Refrigerator Cake
Let’s be honest—sometimes we just need a dessert that looks fancy but doesn’t require a culinary degree. That’s where Brownie Refrigerator Cake comes in. It’s a no-fuss, crowd-pleasing masterpiece that’s easy to prep and even easier to love. The brownies add a dense, chewy foundation while the cream cheese and pudding layers bring a creamy contrast. It’s perfect for holidays, BBQs, or when the chocolate craving hits hard. Plus, it’s completely customizable—swap the pudding flavors, add caramel drizzle, or sprinkle crushed candy bars on top. And unlike some desserts that dry out by day two, this one gets better the longer it chills. It’s like your fridge turns into a five-star pastry chef overnight.
Ingredients Needed to Make Brownie Refrigerator Cake
- 1 box brownie mix (9×13 pan size)
- 1 extra-large egg (for extra fudgy texture)
- 1 (8 oz) package cream cheese, softened
- 1 cup powdered sugar
- 2 (8 oz) containers whipped topping
- 1 (3 oz) package chocolate instant pudding
- 1 (3 oz) package vanilla instant pudding
- 3½ cups milk
- 1 Hershey bar (for shavings) or chocolate syrup for garnish

Instructions to Make Brownie Refrigerator Cake (Step by Step)
If you’ve ever wished for a dessert that looks like it took hours but comes together with minimal effort, this Step-by-Step Brownie Refrigerator Cake guide is for you. Each stage is easy to follow and packed with practical tips to make sure your layers come out smooth, creamy, and picture-perfect. Let’s break it down, step by step, so you can recreate this irresistible no-bake treat right in your kitchen.
Step 1: Bake the Perfect Brownie Base
Start by preparing your favorite boxed brownie mix according to the package directions, but here’s the twist: add one extra-large egg to the batter. This simple Step-by-Step tweak gives your brownies that chewy, fudge-like texture that holds up beautifully under the creamy layers. Bake your brownies in a 9×13-inch pan, then let them cool completely—this part’s crucial. If you spread the next layer while the brownies are warm, it’ll melt and ruin that gorgeous separation of flavors. If you’re short on time, place the pan in the fridge for about 30 minutes to cool faster. For more baking consistency tips, check out our Cinnamon Sugar Twists recipe—it shares a few clever tricks for handling dough and texture.
Step 2: Whip Up the Cream Cheese Layer
Now comes the creamy, dreamy part. In a medium bowl, beat softened cream cheese until smooth and fluffy. Add powdered sugar and continue mixing until no lumps remain. Next, fold in one container of whipped topping. This Step-by-Step process ensures a silky-smooth filling that spreads easily over your brownie base. The goal here is balance—the slight tang from the cream cheese cuts through the sweetness of the brownies, making each bite rich but not overpowering. If you’re craving a flavor twist, you can swap in flavored cream cheese or add a hint of vanilla extract. For more ideas like this, explore our Choco Cheesecake Cookie Bites—they’re another no-bake wonder with a creamy filling.
Step 3: Spread and Smooth the Cream Cheese Mixture
Once your cream cheese layer is ready, gently spread it over the cooled brownies using an offset spatula or the back of a spoon. Take your time with this Step-by-Step motion—slow, even strokes help avoid tearing the brownie base. If you find the mixture sticking, dip your spatula in warm water and smooth again for a clean finish. This layer sets the stage for your pudding to rest perfectly on top.
Step 4: Prepare the Pudding Layer
In a large mixing bowl, whisk together both the chocolate and vanilla instant pudding mixes with 3½ cups of milk. Whisk constantly for 2–3 minutes until it thickens to a smooth, custard-like texture. This is the secret to the cake’s signature creaminess. The dual-pudding combo creates a swirl of flavor—chocolatey, mellow, and perfectly sweet. Following this Step-by-Step method ensures no lumps or grainy texture. Pro tip: use cold milk straight from the fridge to help the pudding set faster. If you enjoy pudding-based desserts, you’ll love our Boston Cream Pie Cookies for another creamy, layered delight.
Step 5: Layer the Pudding Over the Cream Cheese
Once your pudding has thickened, spoon it gently over the cream cheese layer and spread it evenly from edge to edge. Take this step slowly—it’s easy to mix the layers if you rush. This Step-by-Step layering creates a beautiful contrast of textures and colors that’ll make your finished dessert look professionally assembled. You can even get creative here—try using dark chocolate pudding or even butterscotch for a twist.
Step 6: Top with Whipped Topping
Grab your second container of whipped topping and spread it evenly over the pudding layer. Use long, gentle strokes for a smooth finish. This final layer gives your Brownie Refrigerator Cake that signature cloud-like topping. For a touch of flair, sprinkle shaved chocolate from a Hershey bar or drizzle a bit of chocolate syrup over the top. Following this Step-by-Step finishing process not only makes your cake look stunning but adds just the right touch of sweetness to tie everything together.
Step 7: Chill and Set (The Most Important Step!)
This is where the magic happens. Refrigerate your cake for at least two hours before serving—or better yet, overnight. This Step-by-Step chilling process allows the flavors to blend and the texture to firm up into that irresistible, sliceable perfection. The brownies soften slightly, the cream cheese layer melds with the pudding, and every bite becomes cool, creamy heaven. For a complete dessert spread, pair it with Pumpkin Rolls or Toffee Apple Pie with Vanilla Custard—both complement the rich chocolate layers beautifully.
Step 8: Slice, Serve, and Savor
When it’s time to serve, use a sharp knife dipped in warm water for clean, bakery-style slices. Each square will show off the stunning layers you built step by step. Serve it cold and enjoy the look of delight on everyone’s face—it’s that good.
This Step-by-Step Brownie Refrigerator Cake method transforms simple pantry staples into an indulgent, layered masterpiece. Once you try it, you’ll see why it’s a go-to for family gatherings, potlucks, or those nights when your sweet tooth needs a little something special straight from the fridge.
What to Serve with Brownie Refrigerator Cake
This cake is indulgent on its own, but if you want to take things up a notch, serve it with a scoop of vanilla bean ice cream or a drizzle of warm caramel. For a lighter pairing, try fresh strawberries or raspberries—the tartness cuts through the sweetness beautifully. Hosting a dessert spread? Add Pumpkin Rolls or Toffee Apple Pie with Vanilla Custard for a comforting fall-themed lineup that’ll make any gathering feel extra cozy.
Key Tips for Making Brownie Refrigerator Cake
- Cool your brownies completely. Warm brownies will melt your cream cheese layer into chaos.
- Use full-fat cream cheese. It gives that creamy, indulgent texture you want.
- Whisk your pudding thoroughly. You want it thick but not lumpy before layering.
- Chill overnight if possible. The flavors blend beautifully and the texture firms up.
- Get creative with toppings. Think crushed Oreos, peanut butter drizzle, or chopped nuts for texture.
Storage and Reheating Tips for Brownie Refrigerator Cake
Store leftovers covered in the refrigerator for up to 4 days—it actually tastes better on day two. For longer storage, freeze slices individually in airtight containers for up to two months. When ready to enjoy, thaw in the fridge for several hours or overnight. Avoid microwaving; it’s meant to be served cold and creamy. For a detailed guide on freezing desserts like this one, visit Boston Cream Pie Cookies, which also store beautifully.
FAQs
Can I make this ahead of time? Yes! It’s actually better when made a day before serving.
Can I use homemade brownies? Absolutely—go for your favorite recipe. Just make sure they’re completely cooled.
Can I substitute pudding flavors? Definitely. Try caramel, butterscotch, or white chocolate for a fun twist.
Is this dessert kid-friendly? 100%. It’s sweet, soft, and easy for little hands to enjoy.
Final Thoughts
If you’re looking for a dessert that wows without the stress, Brownie Refrigerator Cake is your go-to. It’s rich, creamy, and a little nostalgic—the kind of dessert your family will start requesting by name. Whether it’s a summer barbecue or a cozy winter dinner, this cake delivers every time.
Visit our Pinterest for regular slow cooker recipe updates, or join our Facebook discussions where cooking fans exchange their favorite hearty meal ideas.
Print
Brownie Refrigerator Cake
- Prep Time: 20 minutes
- Cook Time: 30 minutes
- Total Time: 3 hours
- Yield: 12–16 servings 1x
- Category: Dessert
- Method: No-Bake
- Cuisine: American
Description
A delicious no-bake layered dessert with fudgy brownies, creamy pudding, and whipped topping.
Ingredients
- 1 brownie mix (9×13 pan size)
- 1 additional extra-large egg
- 1 package cream cheese (8 oz), softened
- 1 cup powdered sugar
- 2 containers whipped topping (8 oz each)
- 1 package chocolate instant pudding (3 oz)
- 1 package vanilla instant pudding (3 oz)
- 3 1/2 cups milk
- 1 Hershey bar (for shavings) or chocolate syrup
Instructions
1. Prepare the brownies according to package directions, adding an extra egg for a fudgier texture. Let cool completely.
2. Make the cream cheese layer by mixing softened cream cheese, powdered sugar, and one container of whipped topping. Spread over the brownies.
3. Prepare the pudding layer by whisking together the chocolate and vanilla pudding mixes with milk until thick. Spread over the cream cheese layer.
4. Top with the remaining whipped topping, smoothing it evenly.
5. Garnish with chocolate shavings or syrup and refrigerate for at least 2 hours before serving.
Notes
Chill overnight for the best flavor.
Can be stored in the refrigerator for up to 4 days or frozen for 2 months.
Swap pudding flavors for a custom twist.
Nutrition
- Serving Size: 1 slice
- Calories: 400-500
- Sugar: 30-40g
- Sodium: 200mg
- Fat: 20-25g
- Carbohydrates: High
- Protein: 4g