Chocolate Mint Cream Cheese Buttons are the kind of treat that make people close their eyes after the first bite—yes, they’re that good. These melt-in-your-mouth mints with a velvety chocolate center are not just pretty to look at; they’re dangerously addictive. Whether you’re prepping for a holiday party, a baby shower, or just a Tuesday night “I deserve something sweet” moment, these Chocolate Mint Cream Cheese Buttons deliver all the joy with minimal effort. The cool minty cream cheese shell pairs beautifully with the smooth, rich chocolate ganache filling, creating a perfect balance of flavor and texture.
Table of Contents
What is Chocolate Mint Cream Cheese Buttons?
Chocolate Mint Cream Cheese Buttons are a bite-sized dessert made from a soft, mint-flavored cream cheese dough that’s shaped into little buttons and filled with luscious chocolate ganache. Think of them as a cross between a truffle and a classic party mint—creamy, cool, and chocolatey in all the right ways. They’re a staple at weddings, baby showers, and festive holiday platters because they’re elegant yet surprisingly easy to make. The best part? You can play around with colors—green for St. Patrick’s Day, red for Christmas, or even pastel shades for Easter. These little gems are as versatile as they are delicious, and they make a wonderful edible gift too.
Reasons to Try Chocolate Mint Cream Cheese Buttons
Let’s be honest—any recipe that brings chocolate and mint together is already a win. But Chocolate Mint Cream Cheese Buttons go a step further. They’re quick to make (no baking, no complicated tools), they look adorable, and they taste like something from a high-end confectionery. They also keep beautifully in the fridge, which makes them a dream for planning ahead. Whether you’re hosting, gifting, or just craving something special, these little treats are guaranteed to impress. Plus, the combination of mint and chocolate gives you that refreshing sweetness that never feels too heavy.
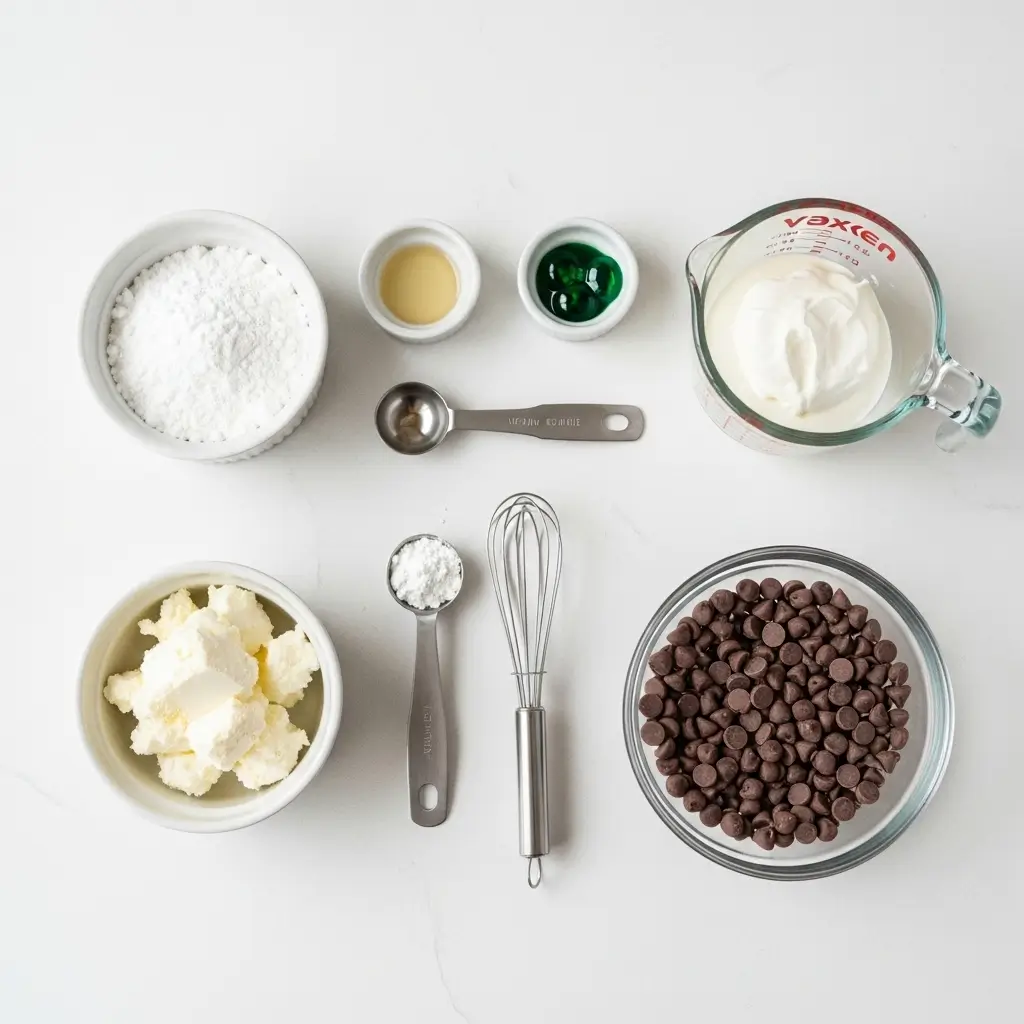
Ingredients Needed to Make Chocolate Mint Cream Cheese Buttons
- 4 oz cream cheese, softened
- 4 ½ cups powdered sugar
- ½ teaspoon mint extract
- Several drops green gel food coloring
- 1 cup heavy whipping cream
- 10 oz semi-sweet chocolate chips
Instructions to Make Chocolate Mint Cream Cheese Buttons (Step by Step)
Making Chocolate Mint Cream Cheese Buttons is pure joy—and easier than you might think. Follow this step by step guide for flawless results every time. From mixing the mint dough to filling it with silky ganache, I’ll walk you through every detail so you’ll feel like you’ve done it a hundred times before.
Step 1: Combine Cream Cheese and Sugar
Start by placing your softened cream cheese into a large mixing bowl. Using a hand mixer or stand mixer, beat the cream cheese with one cup of powdered sugar until smooth and creamy. This is your base for the mint dough. It should look thick but fluffy—almost like frosting. If you’ve ever struggled with cold cream cheese before, check out our baking prep tips to learn how to soften it quickly without melting it.
Step 2: Add Mint Extract and Food Coloring
Next, stir in the mint extract and a few drops of green gel food coloring. This step adds that signature fresh flavor and color that makes these little candies so irresistible. Mix on medium speed until everything is evenly incorporated. Don’t go overboard with the coloring—a little goes a long way! You’re looking for a soft minty green, not neon. If you want to play with flavors, you can easily swap the mint for vanilla or almond extract (see our ingredient substitution guide for flavor ideas).
Step 3: Gradually Add Remaining Sugar
Now, slowly add the rest of the powdered sugar, about half a cup at a time, mixing after each addition. As the dough thickens, it’ll transform from creamy to pliable—like soft playdough. If your mixer starts struggling (and it probably will toward the end), don’t hesitate to switch to using your hands. This gives you better control and helps the dough come together faster. The texture should be firm enough to roll but still slightly tacky.
Step 4: Shape the Buttons
Line a large baking sheet with parchment paper. Scoop out a teaspoon of the dough, roll it between your palms, and form a smooth ball. Place it on the sheet, leaving a little space between each one. Repeat until you’ve used all the dough—this should make about six dozen buttons. To shape the “button” indentations, press gently into the center of each ball using the rounded end of a wooden spoon or a small measuring spoon. If the dough sticks, dust your tool with powdered sugar. For more shaping inspiration, take a peek at our baking hacks for perfect presentation.
Step 5: Chill Until Firm
Once your buttons are shaped, transfer the tray to the refrigerator and chill for about one hour. This step helps the mints firm up, making them easier to fill later. Think of it as giving your dough a quick power nap—it’s essential for holding that perfect little well in the center.
Step 6: Prepare the Chocolate Ganache
While the mints are chilling, it’s time to make the creamy chocolate ganache. Place the chocolate chips in a heatproof bowl or large measuring cup. In a small saucepan, heat the heavy whipping cream over medium heat until it just begins to simmer—bubbles should appear around the edges, but don’t let it boil. Pour the hot cream over the chocolate and let it sit for two minutes (no stirring yet!). Then, stir slowly with a spatula or whisk until smooth, glossy, and completely combined. If you love making ganache-based desserts, you’ll also enjoy our creamy chocolate recipes.
Step 7: Let the Ganache Thicken
Ganache thickens as it cools, so give it about 30 minutes to reach a yogurt-like consistency. You can speed this up by refrigerating it, but check frequently—once it’s too firm, it’s hard to pipe. This step by step patience pays off; perfect texture is key to that irresistible chocolate center.
Step 8: Fill the Mints
Transfer the ganache into a piping bag or a small ziplock bag. Snip off a tiny corner of the bag to create your own quick piping tool. Carefully pipe the ganache into the indentation of each chilled mint until it’s filled but not overflowing. You’re aiming for a neat little dome of chocolate that sits just above the surface. This is the fun part—take your time and enjoy it!
Step 9: Chill and Set
Return the tray to the refrigerator and chill for another hour, or until the ganache is completely set. The mints should be firm to the touch with a glossy chocolate center. Once they’re ready, transfer them to an airtight container and store them in the fridge. These beauties stay fresh for up to two weeks, making them ideal for parties or gifting.
Step 10: Serve and Enjoy
Arrange your Chocolate Mint Cream Cheese Buttons on a pretty platter or pack them in festive tins for sharing. They pair beautifully with a hot drink like our Homemade Chicken Noodle Soup or a creamy dessert coffee after dinner.
What to Serve with Chocolate Mint Cream Cheese Buttons
These little bites are perfect on their own, but they pair beautifully with coffee, hot cocoa, or a glass of milk. They also look stunning on dessert boards next to cookies or truffles. During the holidays, serve them after a hearty dinner like Slow Cooker Buffalo Wings or a cozy main dish like Crockpot Chicken Noodle Soup. Their cool minty flavor offers the perfect refreshing finish.
Key Tips for Making Chocolate Mint Cream Cheese Buttons
- Use softened cream cheese – Cold cream cheese won’t mix smoothly and will make your dough lumpy.
- Go easy on the food coloring – A few drops give a pretty pastel green; too much can make your mints look neon.
- Chill between steps – This helps the mints keep their shape and makes the ganache filling easier to handle.
- Don’t skip the powdered sugar dusting – It prevents sticking and keeps your “buttons” neat.
- Get creative – Swap mint extract for peppermint or add a splash of vanilla for a twist.
Storage and Reheating Tips for Chocolate Mint Cream Cheese Buttons
Store these beauties in an airtight container in the refrigerator for up to two weeks. If you’re making them ahead for an event, you can even freeze them—just separate layers with parchment paper. When ready to serve, let them thaw in the fridge overnight. They taste best chilled, so there’s no need to reheat (honestly, warm mints are not the vibe here).
FAQs
Can I use peppermint extract instead of mint?
Absolutely! Peppermint will give a sharper, more candy-cane flavor.
Can I make them in different colors?
Yes! Use gel food coloring to match your theme—pink for Valentine’s Day, blue for baby showers, you name it.
Do I have to use chocolate ganache?
Not at all. You can fill them with peanut butter, caramel, or even leave them plain for classic cream cheese mints.
How long do they last?
Stored properly in the fridge, they stay fresh for about two weeks.
Final Thoughts
Chocolate Mint Cream Cheese Buttons are the kind of recipe that make you feel like you’ve pulled off something fancy—with half the effort. They’re creamy, rich, and refreshingly minty, and they always get rave reviews. Whether you’re planning a dessert platter or sneaking one from the fridge at midnight, these mints hit the sweet spot every single time.
Visit our Pinterest for regular slow cooker recipe updates, or join our Facebook discussions where cooking fans exchange their favorite hearty meal ideas.
Print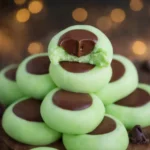
Chocolate Mint Cream Cheese Buttons
- Prep Time: 30 minutes
- Total Time: 30 minutes
- Yield: 6 dozen 1x
- Category: Dessert
- Method: No-Bake
- Cuisine: American
- Diet: Vegetarian
Description
These Chocolate Mint Cream Cheese Buttons are perfect for all occasions! Lovely mint flavored cream cheese mints filled with a decadent chocolate ganache.
Ingredients
- 4 oz cream cheese, softened
- 4 1/2 cups powdered sugar
- 1/2 teaspoon mint extract
- Several drops of green gel food color
- 1 cup heavy whipping cream
- 10 oz semi-sweet chocolate chips
Instructions
1. Combine cream cheese and one cup of powdered sugar in a large bowl and use a stand mixer or hand mixer to combine.
2. Add the extract and gel food color and mix until combined.
3. Gradually add the rest of the powdered sugar and mix until combined, scraping down the sides of the bowl as needed. Use your hands to combine the ingredients if your mixer is not up to the task.
4. Line a large baking sheet with parchment paper.
5. Scoop out a teaspoon of the dough and form into a ball using the palm of your hands. Place it on the prepared baking sheet. Repeat with the rest of the dough.
6. Use the end of a wooden spoon or a small measuring spoon to create indentions in each ball. Dust the measuring spoon with powdered sugar if it sticks.
7. Chill the mints until firm, about 1 hour.
8. Place chocolate chips in a heat-proof bowl or large measuring cup.
9. Bring heavy whipping cream just to a simmer and then pour over the top of the chocolate chips. Stir once or twice and then let sit for 2 minutes.
10. Continue stirring until the chocolate is fully melted and incorporated.
11. Transfer the ganache to a ziploc bag and let it set for 30 minutes or until it has thickened to a yogurt consistency.
12. Cut the corner off of the bag and pipe the ganache into the center of each mint.
13. Chill for about an hour, or until the ganache has set up.
14. Store in refrigerator.
Notes
These delightful mints can be made ahead of time and stored in the fridge for up to a week. You can also switch out the mint extract for peppermint or vanilla for a different flavor twist.
Nutrition
- Serving Size: 2 buttons
- Calories: 110
- Sugar: 14g
- Sodium: 10mg
- Fat: 5g
- Saturated Fat: 3g
- Unsaturated Fat: 1g
- Trans Fat: 0g
- Carbohydrates: 17g
- Fiber: 0g
- Protein: 1g
- Cholesterol: 10mg