Crispy Fried Cheese Balls Recipe That’s Better Than Takeout Recipe—just the name alone makes your mouth water, right? If you’ve ever had one of those late-night “I need something cheesy and crunchy right now” moments, this recipe is about to be your new best friend. Imagine golden, crispy perfection on the outside and a molten, gooey cheese center that’s pure comfort food magic. Whether you’re hosting game night, need an easy appetizer for guests, or just want a snack that tastes like it came straight out of your favorite restaurant (without the delivery fee), this Crispy Fried Cheese Balls Recipe delivers big flavor and that satisfying crunch we all crave.
Table of Contents
What is Crispy Fried Cheese Balls Recipe?
This Crispy Fried Cheese Balls Recipe is a classic party snack that’s all about creamy, cheesy indulgence wrapped in a crispy, golden shell. These little bites of heaven are made from a blend of grated cheese (use mozzarella for that stretch and cheddar for depth), seasoned with aromatic spices, and coated in breadcrumbs before frying to perfection. The result? A snack that’s crunchy on the outside and irresistibly melty inside. It’s an American favorite that’s loved by both kids and adults—perfect for any occasion where finger food reigns supreme. Think of them as your homemade answer to bar-style appetizers but without the hefty restaurant price tag.
Reasons to Try Crispy Fried Cheese Balls Recipe
Why should you make this Crispy Fried Cheese Balls Recipe instead of just ordering takeout? First, because homemade tastes better. You control the ingredients—no mystery oils or preservatives here. Second, it’s quick and surprisingly easy. With less than an hour from start to finish, you’ll be enjoying hot, golden cheese balls before you can finish watching an episode of your favorite show. Third, the flavor combo of garlic, paprika, and oregano gives each bite a kick that’s more than just “cheese and breading.” Finally, they’re incredibly versatile.
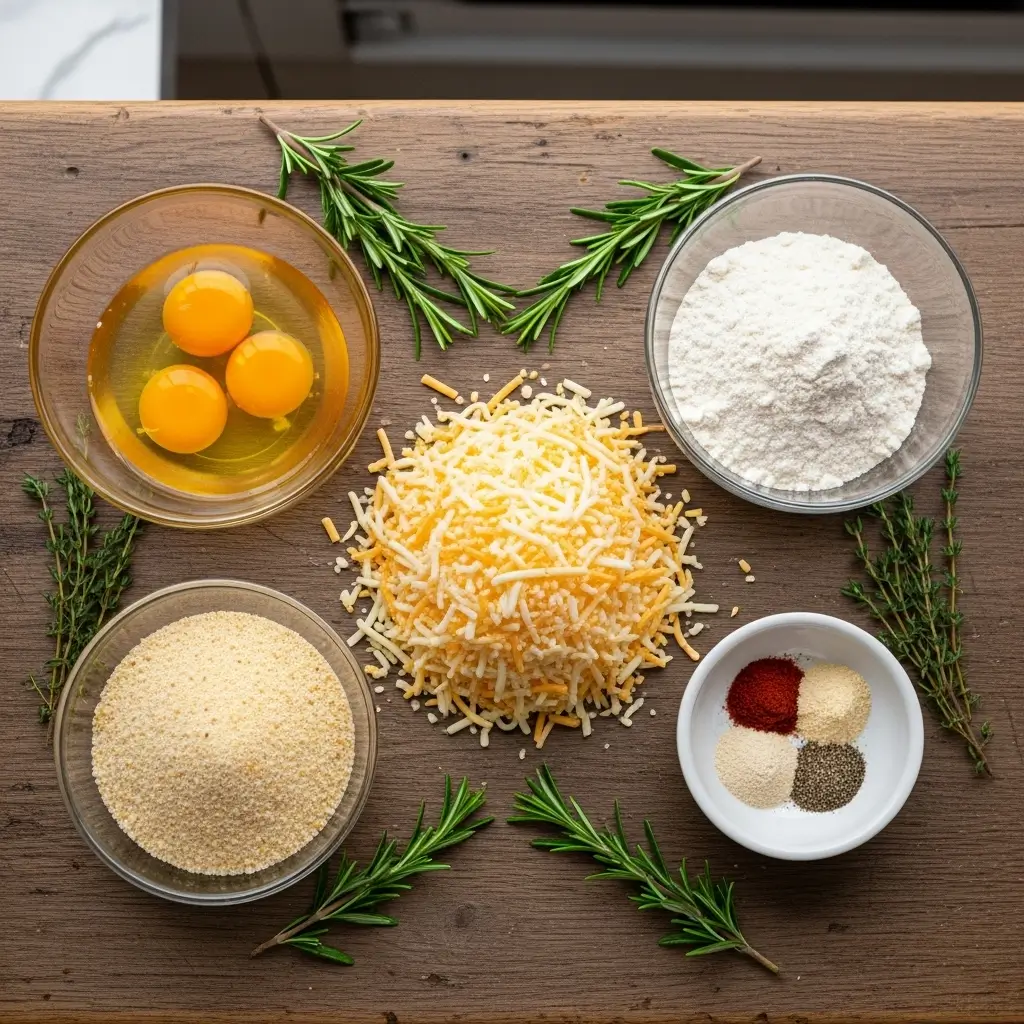
Ingredients Needed to Make Crispy Fried Cheese Balls Recipe
- 4 cups grated cheese (or vegan cheese alternative)
- 2 eggs
- 4 tbsp all-purpose flour
- 2 tsp garlic powder
- 2 tsp onion powder
- 2 tsp oregano
- 1 tsp black pepper
- 1 tsp smoked paprika
- 1 tsp chili flakes
- 1 cup bread crumbs
- 6–8 cups vegetable oil for frying
Instructions to Make Crispy Fried Cheese Balls Recipe (Step by Step)
Making these irresistible cheese bites might sound fancy, but don’t worry—this Step-by-Step Crispy Fried Cheese Balls Recipe is straightforward and fun. Whether you’re a seasoned cook or just someone who loves a good melty cheese moment, this guide will walk you through each stage clearly and confidently. Let’s get cooking!
Step 1: Prepare Your Workspace and Tray
Before you even touch the cheese, set yourself up for success. Line a baking tray with parchment paper—this will be your holding station for the cheese balls once they’re coated. Having your tray ready makes the process smoother and cleaner. Think of it as your snack assembly line! If you’re new to organizing your cooking space, check out our Quick Kitchen Prep Tips for smart ways to stay mess-free and efficient.
Step 2: Mix the Ingredients
In a large mixing bowl, combine your grated cheese, eggs, flour, and all the seasonings: garlic powder, onion powder, oregano, black pepper, smoked paprika, and chili flakes. This is where the flavor magic happens! Use a hand mixer or a sturdy spatula to blend everything until smooth and cohesive. You’re aiming for a slightly sticky but shapeable consistency. If the mixture feels too loose, add a little more flour; if too stiff, mix in a teaspoon of milk. For those who prefer a lighter option, you can use vegan cheese or swap all-purpose flour with a gluten-free blend—our Healthy Garlic Parmesan Chicken Pasta article covers more about smart substitutions that still taste amazing.
Step 3: Form the Cheese Balls
Now comes the fun part—rolling! Scoop about 2 tablespoons of the mixture and roll it between your palms to form small, even-sized balls. Keep them uniform so they cook evenly when frying. If your hands get sticky, lightly dust them with flour or spray them with a little oil. At this stage, your kitchen will already smell amazing—garlic and cheese are a match made in heaven. Set each rolled ball gently on your parchment-lined tray.
Step 4: Coat with Bread Crumbs
This step gives your cheese balls that signature crunch! Roll each one in bread crumbs until completely covered. Make sure every surface is coated—no bare spots allowed. For an extra crispy coating, try a double dip: first roll in flour, then dip in beaten egg, and coat again with bread crumbs. You can even use panko crumbs if you love that ultra-crunchy texture. Want to experiment? Our Jalapeño Popper Stuffed Onion Rings recipe uses a similar method that’s equally addictive.
Step 5: Chill the Cheese Balls
Pop the coated cheese balls into the refrigerator for about 30 to 45 minutes. This Step-by-Step cooling process helps them firm up, preventing them from breaking apart while frying. If you skip this step, you might end up with cheese melting too quickly into the oil—still tasty, but not picture-perfect. This is also a great moment to clean up your space or prepare your dipping sauce. Marinara is the classic choice, but a homemade ranch or chipotle aioli can add a twist. You can find creative dipping ideas in our Crispy Fried Appetizer Collection.
Step 6: Heat the Oil (The Crucial Step-by-Step for Perfect Frying)
Pour 6–8 cups of vegetable oil into a deep, heavy-bottomed pot and heat it to 350–355°F (175–180°C). Use a kitchen thermometer for accuracy—this isn’t the time to guess! Too hot, and your coating burns before the cheese melts; too cool, and the balls soak up excess oil. If you’re new to frying, read our How to Fry Food Like a Pro for easy temperature tips and oil-saving hacks.
Step 7: Fry the Cheese Balls
Carefully lower 4 to 5 cheese balls into the hot oil at a time using a slotted spoon. Avoid overcrowding the pot—keeping space between them helps maintain the oil’s temperature. Fry each batch for about 30 seconds on each side, or until they turn a gorgeous golden brown. The sizzling sound? That’s your cue that crispiness is in the making. Once done, remove them gently and place them on a paper towel-lined tray to drain any excess oil.
Step 8: Drain and Serve
The grand finale! Once all your cheese balls are fried, serve them hot while the centers are still perfectly melty. Arrange them on a platter with small dipping bowls of marinara sauce, ranch, or even sweet chili sauce for variety. Garnish with fresh basil or parsley for a touch of color and freshness. If you’re planning a party, pair them with other crowd-pleasers like Cheesy French Onion Meatballs or a cozy soup like Creamy Marry Me Chicken Soup for a complete comfort spread.
What to Serve with Crispy Fried Cheese Balls Recipe
These cheesy bites are already a crowd-pleaser, but the right sides or dips can take them to another level. Serve them with classic marinara for a pizza-like twist or pair with creamy ranch or chipotle mayo for a smoky kick. If you’re planning a full spread, they go perfectly with lighter dishes like Mushroom Tartlets or a cozy soup like Creamy Turkey Noodle Soup. For drinks, think something refreshing to balance the richness—sparkling lemonade or a crisp beer works beautifully. And if you’re serving them at a get-together, arrange them around a dipping sauce bowl for that irresistible “grab and dip” effect.
Key Tips for Making Crispy Fried Cheese Balls Recipe
- Use a mix of cheeses—mozzarella for stretch, cheddar for tang, and a bit of parmesan if you want extra depth.
- Keep your oil between 350–355°F. Too hot, and the crust burns before the cheese melts.
- Chill your cheese balls before frying. This prevents them from falling apart or melting too quickly.
- For an even crunchier coating, double dip: roll once in bread crumbs, dip in egg, then coat again.
- Want to bake instead? Try 400°F for 12–15 minutes on a parchment-lined sheet for a lighter option.
Storage and Reheating Tips Crispy Fried Cheese Balls Recipe
Leftovers (if there are any!) can be stored in an airtight container in the fridge for up to 3 days. To reheat, skip the microwave—it makes them soggy. Instead, pop them in an air fryer at 375°F for 3–4 minutes or bake them at 400°F for 8–10 minutes until crisp again. They also freeze well: arrange on a tray, freeze until solid, then transfer to a freezer bag. Reheat straight from frozen for about 5 minutes in an air fryer or 12 minutes in the oven. Perfect for those nights when you need something quick and indulgent without the prep.
FAQs
Can I use panko instead of regular breadcrumbs?
Absolutely! Panko gives an extra crispy texture that’s unbeatable.
Can I air fry these instead of deep-frying?
Yes! Air fry at 380°F for 10–12 minutes, flipping halfway.
Can I make them ahead of time?
Yes, shape and coat them, then refrigerate for up to 24 hours before frying.
What cheese works best?
Mozzarella and cheddar are the dream team—melty yet flavorful.
Final Thoughts
There’s just something irresistibly satisfying about biting into a warm, crispy shell and finding molten cheese inside. This Crispy Fried Cheese Balls Recipe That’s Better Than Takeout Recipe isn’t just easy—it’s pure comfort food joy. Perfect for parties, family nights, or whenever your taste buds demand a little indulgence. Pair them with a cozy soup like Creamy Marry Me Chicken Soup and thank yourself later.
Visit our Pinterest for regular slow cooker recipe updates, or join our Facebook discussions where cooking fans exchange their favorite hearty meal ideas.
Print
Crispy Fried Cheese Balls Recipe That’s Better Than Takeout Recipe
- Prep Time: 15 minutes
- Cook Time: 40 minutes
- Total Time: 55 minutes
- Yield: 24 servings 1x
- Category: Appetizer
- Method: Frying
- Cuisine: American
- Diet: Vegetarian
Description
These Crispy Fried Cheese Balls are a delightful appetizer that’s better than takeout! Made with a flavorful blend of cheeses and spices, coated in crunchy bread crumbs, and fried to golden perfection, they make a perfect party snack or starter. Serve hot with marinara sauce and fresh basil for a mouthwatering treat everyone will love.
Ingredients
- 4 cups grated cheese or vegan cheese
- 2 eggs
- 4 tbsp all-purpose flour
- 2 tsp garlic powder
- 2 tsp onion powder
- 2 tsp oregano
- 1 tsp black pepper
- 1 tsp smoked paprika
- 1 tsp chili flakes
- 1 cup bread crumbs
- 6–8 cups vegetable oil (for frying)
Instructions
1. Prepare the tray: Line a baking tray with parchment paper and set it aside to hold the cheese balls after coating.
2. Mix ingredients: In a large bowl, combine the grated cheese, eggs, all-purpose flour, garlic powder, onion powder, oregano, black pepper, smoked paprika, and chili flakes. Use a hand mixer to mix until fully incorporated and the mixture is uniform.
3. Form cheese balls: Scoop approximately 2 tablespoons of the mixture and roll into small, even-sized balls using your hands for consistency.
4. Coat with bread crumbs: Coat each cheese ball evenly in bread crumbs, ensuring they are fully covered, then place them on the prepared parchment-lined tray.
5. Chill: Refrigerate the coated cheese balls for 30 to 45 minutes to allow them to firm up and maintain their shape during frying.
6. Prepare for frying: Line another tray with paper towels to drain the excess oil after frying.
7. Heat oil: In a deep pot, heat 6 to 8 cups of vegetable oil to a temperature of 350–355°F (175–180°C); use a kitchen thermometer to ensure accurate temperature for perfect frying.
8. Fry cheese balls: Fry 4 to 5 cheese balls at a time carefully in the hot oil until golden brown, about 30 seconds on each side. Avoid overcrowding to maintain oil temperature.
9. Drain excess oil: Using a slotted spoon, remove the fried cheese balls from the oil and place them on the paper towel-lined tray to drain excess oil.
10. Serve: Serve the crispy fried cheese balls immediately with marinara sauce and fresh basil for a delicious appetizer or snack.
Notes
Use a mix of cheeses like mozzarella and cheddar for richer flavor and better melting quality.
Ensure the oil temperature is maintained at 350–355°F to avoid greasy cheese balls.
You can substitute bread crumbs with panko for even crispier coating.
Refrigerating the cheese balls before frying helps to keep them from falling apart in the oil.
Serve immediately for best texture and taste as cheese balls tend to soften over time.
Nutrition
- Serving Size: 1 cheese ball
- Calories: 110
- Sugar: 0g
- Sodium: 180mg
- Fat: 9g
- Saturated Fat: 4g
- Unsaturated Fat: 4g
- Trans Fat: 0g
- Carbohydrates: 4g
- Fiber: 0g
- Protein: 5g
- Cholesterol: 25mg