Korean Baked Cauliflower is about to become your new kitchen obsession because it honestly hits every single flavor note you’ve been craving. If you are a busy woman trying to juggle a million things while still putting a healthy-ish dinner on the table that won’t result in a “vegetable protest” from the kids or a bored spouse, this Korean Baked Cauliflower is your secret weapon. I know the struggle of staring into the fridge at 5:30 PM, feeling like a zombie, and wanting something that tastes like high-end takeout without the greasy aftermath or the hefty delivery fee. This dish brings that iconic, spicy-sweet punch of Korean street food right into your cozy kitchen with minimal effort and maximum reward. Trust me, even the most dedicated meat-eaters in your house will be reaching for seconds once they smell that toasted sesame and garlic wafting through the air. It is simple, fast, and remarkably satisfying for those nights when you need a win that doesn’t involve a sink full of dishes or a complicated list of steps.
What is Korean Baked Cauliflower?
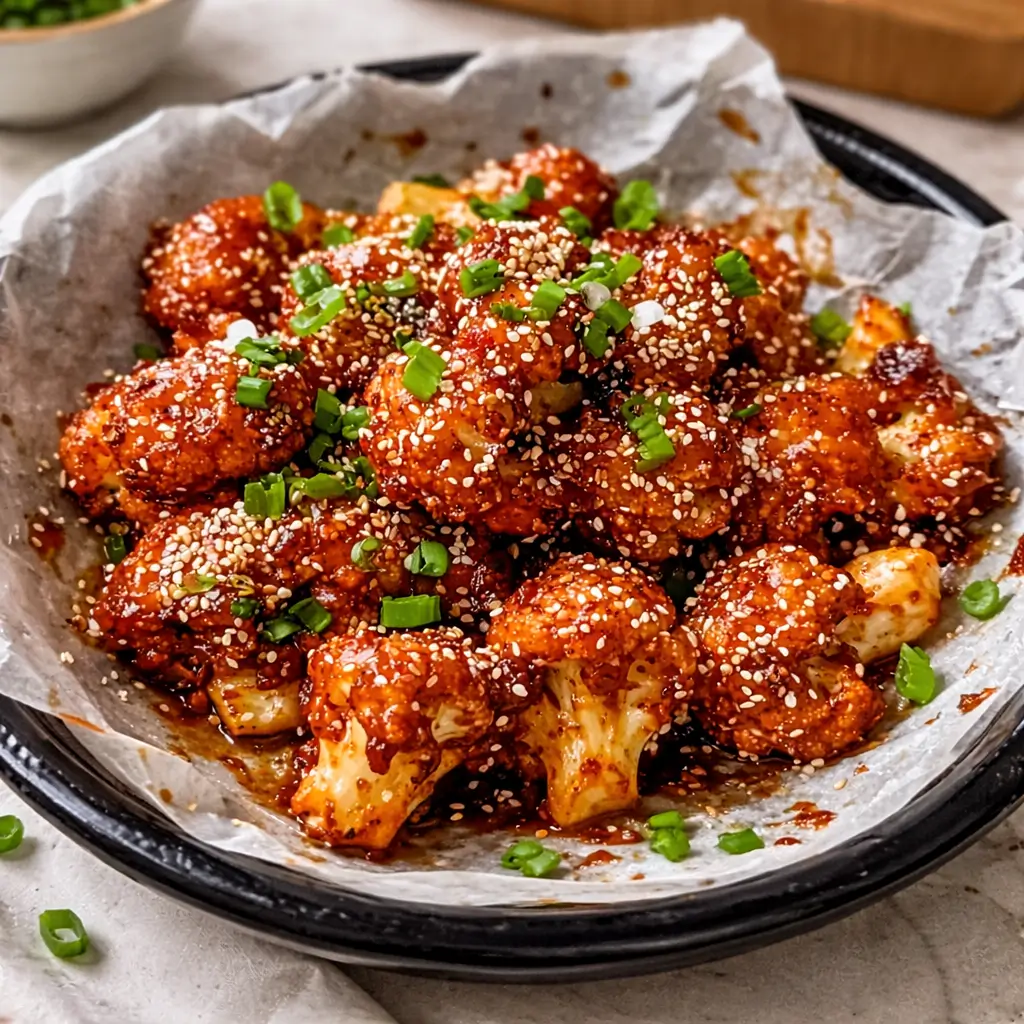
Korean Baked Cauliflower is a brilliant, plant-based twist on traditional Korean fried chicken, swapping out the heavy batter and deep-frying for a much lighter, oven-roasted approach. The star of the show is the cauliflower, which transforms in the heat of the oven into tender, caramelized nuggets with perfectly crispy edges that hold onto sauce like a dream. But the real magic happens with the glaze, which relies on gochujang, a fermented Korean chili paste that offers a complex depth of flavor you just can’t get from standard hot sauce. It is savory, slightly sweet, and has a lingering heat that feels like a warm hug rather than a mouth-burning fire. By roasting the florets at a high temperature, you get a texture that is firm yet biteable, making it a fantastic alternative for anyone looking to cut back on meat without sacrificing the bold, “umami” experience of Asian cuisine. It’s basically a party in your mouth, and everyone is invited.
Reasons to Try Korean Baked Cauliflower
You should definitely try Korean Baked Cauliflower because it is a total game-changer for your weekly meal rotation. First off, it is incredibly budget-friendly, as cauliflower is usually a steal at the grocery store compared to high-quality proteins. Secondly, it is packed with nutrients but tastes like a total indulgence, which is the ultimate “mom win” when you’re trying to sneak more veggies into the family diet. This recipe is also naturally vegetarian and can be easily made vegan or gluten-free with a simple swap of honey for maple syrup or soy sauce for tamari. Because we bake it instead of frying, you save yourself the mess of oil splatters on your stove and the extra calories that come with deep-frying. Plus, it is versatile enough to work as a “wow-factor” appetizer for a weekend get-together or as a main dish served over a steaming bowl of jasmine rice on a hectic Tuesday night.
Ingredients Needed to Make Korean Baked Cauliflower
- 1 large head of cauliflower: You want to pick one that feels heavy for its size and has tightly packed, creamy white florets without any brown spots.
- 2 tablespoons olive oil: This helps the cauliflower roast to a beautiful golden brown without sticking to the pan.
- ½ teaspoon salt: A basic necessity to bring out the natural sweetness of the vegetable.
- ½ teaspoon black pepper: Adds just a tiny bit of classic warmth to the base seasoning.
- 2 tablespoons gochujang: This Korean red chili paste is the soul of the dish; look for it in the international aisle of your local grocery store.
- 2 tablespoons soy sauce: Use tamari if you need to keep things strictly gluten-free for your gut health.
- 1 tablespoon sesame oil: A little goes a long way to provide that signature toasted, nutty aroma.
- 1 tablespoon honey or maple syrup: This provides the perfect sticky sweetness to balance out the spicy chili paste.
- 1 teaspoon rice vinegar: A splash of acidity is vital to brighten the whole flavor profile and keep the sauce from feeling too heavy.
- 2 garlic cloves, minced: Because, let’s be honest, you can never really have too much garlic in a savory dish.
- 1 teaspoon grated fresh ginger: This adds a zesty, peppery kick that makes the sauce taste professional and fresh.
- 1 teaspoon toasted sesame seeds: These are for the final garnish to add a lovely little crunch.
- 2 green onions, sliced: These add a pop of bright green color and a fresh, mild onion bite at the very end.
Instructions to Make Korean Baked Cauliflower – Step by Step
Step 1: Prep and Season Your Cauliflower
The very first Step by Step action you need to take is getting that oven screaming hot at 400°F (200°C). While the oven is warming up, grab your cauliflower and break it down into bite-sized florets; aim for uniform sizes so they all cook at the same rate. Throw those beauties into a large bowl and drench them in olive oil, salt, and pepper. Use your hands or a big spoon to toss them until every single nook and cranny is coated in that oil. This Step by Step preparation ensures that the cauliflower doesn’t just steam in the oven but actually roasts and develops those brown, crispy bits we all love.
Step 2: The Initial Roast for Texture
Next in our Step by Step guide, spread the florets out on a large baking sheet. Make sure they aren’t crowded; if they are too close together, they’ll release steam and get mushy instead of crispy. Slide them into the oven for about 25 to 30 minutes. You’ll want to flip them halfway through the timer to make sure both sides get some love from the heat. You are looking for a tender inside and a golden-brown, slightly charred outside. This Step by Step roasting process is what builds the structural foundation of the dish before the sauce even enters the picture.
Step 3: Whisking the Signature Glaze
While your cauliflower is doing its thing in the oven, it’s time to move to the next Step by Step phase: the sauce. In a small bowl, whisk together your gochujang, soy sauce, sesame oil, honey, rice vinegar, garlic, and ginger. It might look a bit thick at first, but keep whisking until it is smooth and glossy. To really take it to the level of a restaurant quality glaze, pour this mixture into a small saucepan and simmer it over medium heat for about 3 to 5 minutes. This Step by Step simmering allows the flavors to meld together and the sauce to thicken slightly so it clings to the cauliflower like a dream.
Step 4: Coating and the Final Bake
Once the cauliflower is out of the oven and looking gorgeous, it’s time for the most satisfying Step by Step moment. Drizzle that warm, spicy glaze all over the roasted florets and toss them gently so you don’t break the tender pieces. If you want a really sticky, caramelized finish—which I highly recommend—pop the tray back into the oven for another 5 minutes. This final Step by Step bake helps the sugars in the honey and gochujang set, creating a lacquered effect that is absolutely irresistible.
Step 5: The Finishing Touches and Serving
The final Step by Step instruction involves the garnish, because we eat with our eyes first, right? Sprinkle those toasted sesame seeds and sliced green onions over the top while the cauliflower is still hot and glistening. This Step by Step addition adds texture and a fresh contrast to the deep, roasted flavors of the dish. Now, simply pile it high on a plate and watch how fast it disappears.
What to Serve with Korean Baked Cauliflower
To turn this into a full-blown feast, I love serving this over a fluffy bed of white or brown rice to soak up every drop of that extra sauce. If you’re feeling a bit more adventurous, try pairing it with some quick-pickled cucumbers or a simple slaw made with shredded cabbage and a lime vinaigrette to cut through the richness. It also works beautifully alongside some stir-fried bok choy or even as a filling for fusion-style tacos with a drizzle of spicy mayo. For those looking for a lower-carb option, serving it inside large butter lettuce leaves makes for a refreshing and light meal that still feels like a treat.
Key Tips for Making Korean Baked Cauliflower
One big tip is to make sure your cauliflower is completely dry after washing it; if it’s wet, the oil won’t stick, and it won’t get that “crunch” you’re looking for. Also, don’t be afraid of the gochujang heat; if you’re worried it’ll be too spicy for the kids, just add an extra teaspoon of honey to mellow things out. If you have an air fryer, you can definitely use it for the roasting steps to save even more time, just keep an eye on it as air fryers tend to cook things much faster. Lastly, always use fresh ginger and garlic if you can—the jarred stuff just doesn’t have the same “zing” that makes this dish truly pop.
Storage and Reheating Tips Korean Baked Cauliflower
If you actually have leftovers (which is rare in my house), store them in an airtight container in the fridge for up to 3 days. When you’re ready to eat them again, avoid the microwave if you can, as it will make the cauliflower quite soft. Instead, throw them back into a hot oven or a toaster oven at 350°F for about 10 minutes to help them regain some of that crispiness. If you’re in a rush, a quick toss in a dry skillet over medium heat also works wonders to revive the sauce and the texture.
FAQs
Is gochujang very spicy? It has a kick, but it’s more of a sweet-savory heat than a burning spice. It’s generally quite manageable for most palates. Can I use frozen cauliflower? You can, but it won’t get nearly as crispy as fresh. If you use frozen, roast it for a bit longer and expect a softer texture. How do I make this gluten-free? Just ensure your gochujang is labeled gluten-free (some brands use barley) and swap the soy sauce for tamari or coconut aminos. Can I make this ahead of time? You can roast the cauliflower and make the sauce ahead, but I’d wait to combine them and do the final bake until you’re ready to serve for the best texture.
Final Thoughts
Making Korean Baked Cauliflower is honestly one of the easiest ways to bring a burst of international flavor into your home without a lot of stress. It’s a dish that proves vegetables don’t have to be boring or just a “side thought” on the plate. Whether you’re a seasoned pro in the kitchen or someone who usually relies on the microwave, this recipe is straightforward enough to guarantee a win. So, grab a head of cauliflower this week and give your taste buds something to celebrate—you deserve a meal that is as vibrant and exciting as you are.
Print
Korean Baked Cauliflower: The Only Recipe You Need for a Flavorful Meatless Win
- Prep Time: 10 minutes
- Cook Time: 35 minutes
- Total Time: 45 minutes
- Yield: 4 servings 1x
- Category: Side Dish
- Method: Baked
- Cuisine: Korean
- Diet: Vegetarian
Description
Crispy roasted cauliflower tossed in a bold, sweet and spicy Korean gochujang sauce, perfect as a flavorful side or plant-based main.
Ingredients
- 1 large head cauliflower, cut into florets
- 2 tablespoons olive oil
- 1/2 teaspoon salt
- 1/2 teaspoon black pepper
- For the sauce:
- 2 tablespoons gochujang
- 2 tablespoons soy sauce or tamari
- 1 tablespoon sesame oil
- 1 tablespoon honey or maple syrup
- 1 teaspoon rice vinegar
- 2 garlic cloves, minced
- 1 teaspoon fresh ginger, grated
- 1 teaspoon toasted sesame seeds
- 2 green onions, sliced
Instructions
1. Preheat oven to 400°F (200°C).
2. Toss cauliflower florets with olive oil, salt, and pepper until evenly coated.
3. Spread cauliflower on a baking sheet in a single layer and roast for 25-30 minutes, flipping halfway, until golden and crispy.
4. In a bowl, whisk together gochujang, soy sauce, sesame oil, honey, rice vinegar, garlic, and ginger.
5. Transfer sauce to a small saucepan and simmer over medium heat for 3-5 minutes until slightly thickened.
6. Remove roasted cauliflower from oven and toss with the sauce until well coated.
7. Optional: return coated cauliflower to oven for 5 minutes for extra caramelization.
8. Garnish with sesame seeds and green onions, then serve hot.
Notes
Adjust gochujang to control spice level.
Use tamari instead of soy sauce for a gluten-free option.
For extra crispiness, avoid overcrowding the baking sheet.
Pairs well with rice, noodles, or as a side to grilled dishes.
Stores well in the fridge for up to 3 days and reheats easily.
Nutrition
- Serving Size: 1 portion
- Calories: 180-200
- Sugar: 6 g
- Sodium: 600 mg
- Fat: 14 g
- Saturated Fat: 2 g
- Unsaturated Fat: 11 g
- Trans Fat: 0 g
- Carbohydrates: 18 g
- Fiber: 4 g
- Protein: 4 g
- Cholesterol: 0 mg