Salted Caramel Cookies are the kind of treat that can turn an ordinary afternoon into something downright magical. Imagine buttery shortbread with a golden caramel center that oozes sweetness, then add just a pinch of sea salt on top—pure bliss. These cookies strike that perfect balance between sweet and salty, chewy and crisp. Whether you’re baking them for a holiday cookie swap, a cozy movie night, or just because you deserve something amazing, these little beauties deliver every time. And the best part? You don’t need to be a pastry chef to pull them off—just a whisk, a spoon, and about an hour. So grab your apron and let’s make your kitchen smell like heaven.
Table of Contents
What is Salted Caramel Cookies?
Salted Caramel Cookies are buttery thumbprint-style cookies filled with homemade caramel and sprinkled with sea salt. They combine the tender texture of shortbread with the rich depth of golden caramel. It’s a flavor profile that feels gourmet yet homestyle—fancy enough for gifting, simple enough for a weeknight bake. The secret is in that homemade caramel—it’s rich, glossy, and slightly nutty from the cooked sugar. These cookies are often found on bakery shelves, but when you bake them at home, you control everything from sweetness to salt level. The contrast between the soft cookie base and the gooey caramel is simply irresistible, making every bite a little moment of joy.
Reasons to Try Salted Caramel Cookies
First, let’s be honest: the words “salted caramel” alone should be reason enough. These cookies are indulgent without being over-the-top, sweet but balanced. You’ll love how the dough comes together easily with pantry staples—no special trips to the store. Plus, they freeze beautifully, so you can make a batch now and sneak one out later (I won’t tell). For those who love a good sweet-and-salty combo, these are your dream cookies. And if you’re looking for a dessert that feels fancy but doesn’t stress you out, this recipe is pure gold. You can even pair them with a mug of cocoa, or better yet, your morning coffee—because who says cookies are just for dessert?
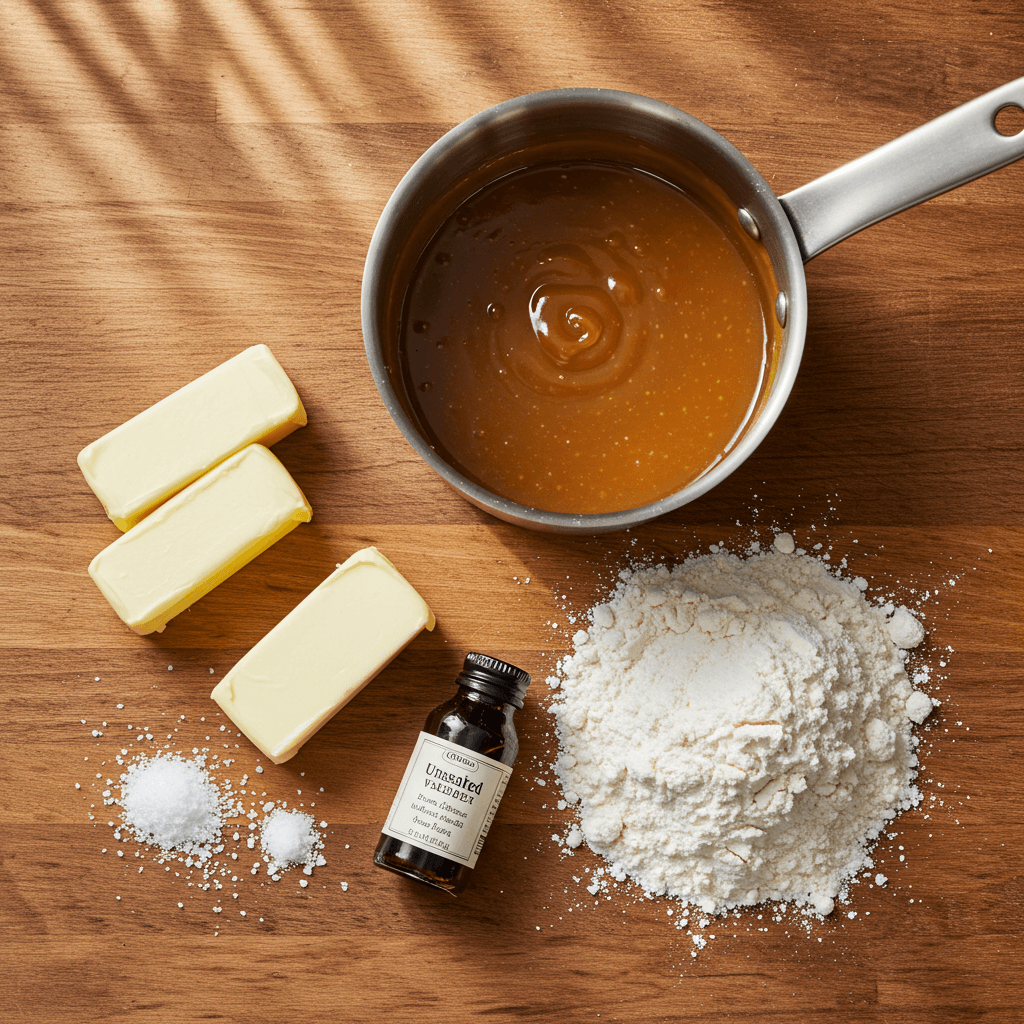
Ingredients Needed to Make Salted Caramel Cookies
- 1 cup unsalted butter, softened
- 2/3 cup granulated sugar
- 1/2 teaspoon vanilla extract
- 2 cups all-purpose flour
- 1/4 teaspoon salt
For the Caramel: - 1 cup granulated sugar
- 6 tablespoons unsalted butter
- 1/2 cup heavy cream
- 1 teaspoon flaky sea salt
Instructions to Make Salted Caramel Cookies (Step by Step Guide)
Baking these Salted Caramel Cookies step by step is as fun as it is rewarding. Follow along closely, and by the end, you’ll have golden, buttery cookies filled with smooth, rich caramel that’ll make everyone ask for seconds. Let’s dive into each step and make sure your kitchen smells like pure happiness.
Step 1: Cream the Butter and Sugar
Start by placing 1 cup of softened butter and 2/3 cup of granulated sugar into a large mixing bowl. Using a hand mixer or stand mixer, beat them together for about three minutes until the mixture looks pale, fluffy, and almost cloud-like. This step is crucial — creaming the butter and sugar introduces air into the dough, giving your cookies that perfect melt-in-your-mouth texture. If your butter isn’t soft enough, don’t panic — you can learn a quick trick for that in our baking preparation tips guide. Once creamed, add the vanilla extract and mix again until well combined. The sweet aroma at this point will already make you excited for what’s coming next.
Step 2: Combine the Dry Ingredients
In a separate bowl, whisk together 2 cups of all-purpose flour and 1/4 teaspoon of salt. Slowly add this flour mixture into your creamed butter mixture, mixing on low speed just until everything is combined. Be careful not to overmix — you’re making cookies, not bread! The dough should be soft but not sticky, holding its shape when rolled into a ball. If you live in a humid climate, you might need to add an extra tablespoon of flour to get the right consistency. For more tips on handling dough textures, check out our cookie dough troubleshooting post.
Step 3: Chill the Dough
Next, cover the dough and chill it in the refrigerator for 30 minutes. This step helps the butter firm up again, which prevents the cookies from spreading too much during baking. Think of it as giving your dough a quick nap before showtime. While your dough chills, preheat the oven to 350°F (175°C) and line two baking sheets with parchment paper. Prepping your workspace in advance makes the process smoother and stress-free.
Step 4: Shape the Cookies
Once your dough is chilled, scoop out small portions and roll them into 1-inch balls. Place them about 2 inches apart on your prepared baking sheets. This spacing gives them room to bake evenly without merging into each other (we’ve all been there). Now for the fun part — use your thumb or the back of a rounded measuring teaspoon to make a small indentation in the center of each ball. This is where that luscious caramel will sit later. If you’re working with warm hands and the dough softens, pop the tray back in the fridge for 10–15 minutes before baking. Little pauses like this can make a big difference in the final texture.
Step 5: Bake to Perfection
Bake your cookies for 10–12 minutes, just until the edges start turning a light golden brown. Keep a close eye on them because these buttery cookies can go from golden to burnt in a flash. When you pull them out, you might notice the indentations puffing up slightly — no worries! Gently press them down again using the back of your spoon while they’re still warm and soft. Then, let the cookies cool completely on the baking sheets. This cooling process helps the centers stay tender and prevents breakage when adding the caramel.
Step 6: Make the Homemade Caramel (The Sweet Centerpiece)
Now comes the part that transforms these from good to unbelievably delicious. In a medium saucepan over medium heat, add 1 cup of sugar. Watch carefully as it melts and turns a deep amber color — this is when the sugar caramelizes, giving that signature nutty flavor. Avoid stirring; instead, swirl the pan gently for even cooking. Once the sugar is fully melted and golden, carefully whisk in 6 tablespoons of butter. It will bubble up like crazy — that’s normal! Stir until the butter is fully incorporated, then slowly add 1/2 cup of heavy cream, whisking constantly. Let it boil for one minute before removing it from the heat.
Step 7: Fill and Finish
While the caramel is still warm and pourable, spoon it gently into the indentations of each cooled cookie. Don’t overfill — a small pool in the center is plenty. Finish each one with a sprinkle of flaky sea salt, which enhances the sweetness and adds that irresistible contrast. Let the cookies sit at room temperature until the caramel sets slightly. If you want that bakery-style glossy finish, give them an extra minute in a warm oven (about 200°F) just to help the caramel settle beautifully.
Step 8: Cool, Serve, and Enjoy
Once set, transfer your Salted Caramel Cookies to a serving plate or airtight container. Take a moment to admire your handiwork — you just made bakery-quality cookies step by step, right in your own kitchen! Serve them with coffee, tea, or even a scoop of ice cream for a decadent dessert combo.
Key Tips for Making Salted Caramel Cookies
- Chill your dough – Warm dough spreads too much, so 30 minutes in the fridge helps maintain that perfect thumbprint shape.
- Caramel caution – Hot sugar is serious business; use a long-handled whisk and keep your face back when adding butter and cream.
- Sea salt matters – Use flaky salt like Maldon or fleur de sel. Table salt will overpower the caramel.
- Don’t overbake – These cookies should be just lightly golden. Overbaking leads to dryness.
- Make ahead – Both dough and caramel can be made a day ahead and stored in the fridge.
Storage and Reheating Tips for Salted Caramel Cookies
Store cookies in an airtight container at room temperature for up to five days. The caramel will firm up but stay chewy. For longer storage, freeze them in a single layer, then transfer to a bag once solid. To enjoy again, thaw at room temperature or warm briefly in a 300°F oven for 3–4 minutes to soften the caramel. If your caramel becomes too thick to pour while making, simply reheat it gently over low heat until smooth again.
FAQs
Can I use store-bought caramel? Yes, but homemade caramel has a deeper flavor and creamier texture.
What’s the best way to get perfect thumbprints? Use the back of a rounded measuring teaspoon—it’s more consistent than using your thumb.
Can I make them gluten-free? Substitute with a 1:1 gluten-free baking flour mix; the texture will be slightly softer.
Do they need to be refrigerated? No, but keep them in a cool place to prevent caramel from melting.
Final Thoughts
Salted Caramel Cookies are the kind of dessert that make you close your eyes after the first bite and just smile. The buttery cookie, the smooth caramel, the sprinkle of salt—it’s comfort and sophistication all in one. Whether you’re baking them for friends, family, or just for your own midnight snack stash, they never disappoint.
Visit our Pinterest for regular slow cooker recipe updates, or join our Facebook discussions where cooking fans exchange their favorite hearty meal ideas.
Print
Salted Caramel Cookies
- Prep Time: 20 minutes
- Cook Time: 12 minutes
- Total Time: 50 minutes
- Yield: 24 servings 1x
- Category: desserts
- Method: baking
- Cuisine: American
Description
Buttery shortbread-style cookies with a thumbprint center filled with rich homemade caramel and sprinkled with flaky sea salt.
Ingredients
- 1 cup unsalted butter, softened
- 2/3 cup granulated sugar
- 1/2 teaspoon vanilla extract
- 2 cups all-purpose flour
- 1/4 teaspoon salt
- 1 cup granulated sugar (for caramel)
- 6 tablespoons unsalted butter (for caramel)
- 1/2 cup heavy cream
- 1 teaspoon flaky sea salt
Instructions
1. Cream together softened butter and 2/3 cup sugar until light and fluffy, about 3 minutes.
2. Add vanilla extract and mix well.
3. In a separate bowl, whisk together flour and salt.
4. Gradually add to the butter mixture, mixing just until combined. The dough should be soft but not sticky.
5. Chill the dough for 30 minutes.
6. Preheat oven to 350°F (175°C) and line baking sheets with parchment paper.
7. Roll dough into 1-inch balls. Place on prepared baking sheets 2 inches apart.
8. Using your thumb or the back of a teaspoon, make an indentation in the center of each cookie.
9. Bake for 10-12 minutes until the edges are just beginning to turn golden.
10. If the indentations have puffed up, gently press them down again while cookies are still warm.
11. Allow to cool completely on the baking sheets.
12. For the caramel, place 1 cup sugar in a medium saucepan over medium heat.
13. Watch carefully as sugar melts and turns amber, swirling the pan occasionally but not stirring.
14. Once sugar is completely melted and amber colored, carefully add the 6 tablespoons butter (it will bubble vigorously).
15. Whisk until butter is incorporated, then slowly add cream while continuing to whisk.
16. Allow caramel to boil for 1 minute, then remove from heat and let cool slightly.
17. Spoon the warm caramel into the thumbprint indentations of each cookie.
18. Sprinkle with flaky sea salt while caramel is still warm.
Notes
The caramel will be very hot when first made – allow it to cool slightly before handling or filling cookies.
If the cookie dough becomes too soft while working with it, return it to the refrigerator for 10-15 minutes to firm up.
Store cookies in an airtight container at room temperature for up to 5 days, or freeze for longer storage.
For perfectly shaped thumbprints, use the back of a rounded measuring teaspoon rather than your thumb.
The caramel will thicken as it cools – if it becomes too thick to pour, gently rewarm it.
Nutrition
- Serving Size: 1 cookie
- Calories: 180
- Sugar: 14g
- Sodium: 60mg
- Fat: 10g
- Saturated Fat: 6g
- Unsaturated Fat: 3g
- Trans Fat: 0g
- Carbohydrates: 22g
- Fiber: 0g
- Protein: 1g
- Cholesterol: 25mg