Red White and Blue Mixed Berry Dessert is the absolute hero of every summer cookout I’ve ever hosted. Since I’m a California girl born in September, I’ve spent my fair share of sunny afternoons looking for that one perfect dish that doesn’t require turning on the oven when it’s ninety degrees outside. This Red White and Blue Mixed Berry Dessert hits every single mark because it is incredibly creamy, refreshingly fruity, and has that buttery crunch we all crave. Whether you are prepping for a frantic Fourth of July bash or just want a festive weekend treat for the kids, this layered masterpiece is a total lifaker. I remember the first time I made this; my kids actually stopped running around for five whole minutes just to inhale their slices, which is basically a miracle in my house. You don’t need to be a professional pastry chef to nail this because the process is straightforward and foolproof. It’s one of those recipes that looks like you spent hours in the kitchen, but honestly, it’s our little secret that it’s mostly just clever layering and a bit of patience while it chills.
What is Red White and Blue Mixed Berry Dessert?
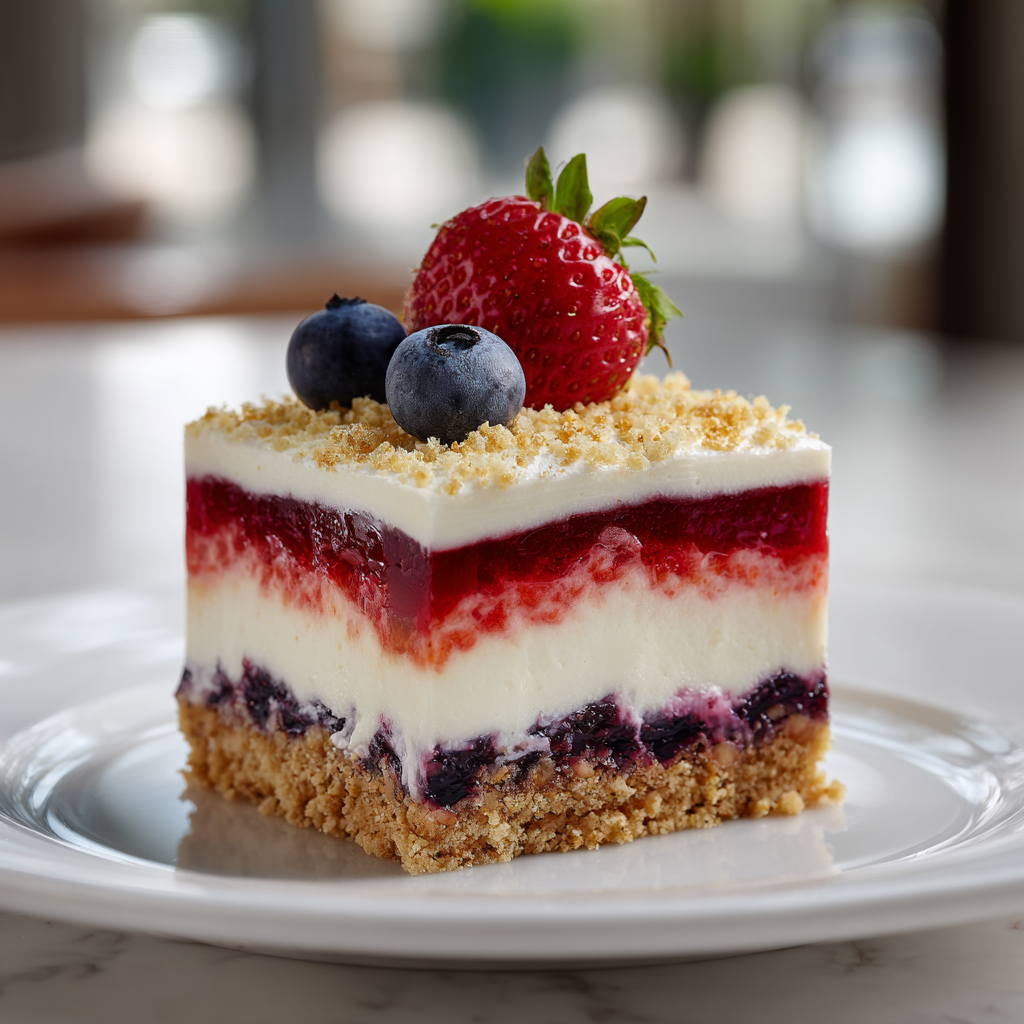
This stunning treat is a classic “yum yum” style dessert, which is basically a fancy way of saying it’s a layered icebox cake. It starts with a sturdy graham cracker base that provides a salty-sweet foundation for everything else. On top of that, we pile fluffy clouds of sweetened cream cheese folded into homemade whipped cream. The “Red White and Blue” part comes from alternating these snowy white cream layers with vibrant strawberry and blueberry pie fillings. Because it’s a no-bake recipe, the textures stay light and airy rather than dense or heavy. It’s a patriotic showstopper that celebrates the best colors of summer, making it a staple for Memorial Day, Labor Day, or any Tuesday when you feel like being a bit “extra” for your family.
Reasons to Try Red White and Blue Mixed Berry Dessert
If you are constantly battling a lack of time—and let’s be real, which of us isn’t?—this recipe is your new best friend. First, you won’t break a sweat because there is zero baking involved, keeping your kitchen cool and your stress levels low. Second, it is a massive crowd-pleaser that appeals to everyone from picky toddlers to grandpas who claim they don’t like “sugary stuff.” The balance of the tart fruit against the rich cream cheese means it isn’t cloying, just perfectly satisfying. Plus, it’s a great make-ahead option since it actually tastes better after sitting in the fridge overnight. You can whip it up on a Friday evening and have the perfect dessert ready for a Saturday afternoon BBQ without any last-minute scrambling.
Ingredients Needed to Make Red White and Blue Mixed Berry Dessert
- 2 cups graham cracker crumbs: These provide the essential crunchy base; you can buy them pre-crushed or smash them yourself in a bag if you’ve had a stressful day.
- 0.5 cup unsalted butter (melted): This acts as the glue that turns those crumbs into a delicious, buttery crust.
- 16 oz cream cheese: You’ll need two 8oz packages, and please make sure they are softened to room temperature so you don’t end up with tiny white lumps.
- 1 cup confectioners’ sugar: This dissolves instantly into the cream cheese for a silky, smooth texture.
- 2 cups cold whipping cream: Make sure this is straight from the fridge; cold cream whips up much faster and holds its shape better.
- 2 tsp vanilla extract: Split this up—half goes into the cream cheese mixture and the other half into the whipped cream for a deep, cozy flavor.
- 0.25 cup granulated sugar: Just a touch to give the whipped cream that perfect hit of sweetness.
- 1 can strawberry pie filling (approx. 21 oz): This gives us our “Red” layer with big chunks of sweet fruit.
- 1 can blueberry pie filling (approx. 21 oz): This provides the “Blue” layer and a wonderful tart contrast to the strawberries.
Instructions to Make Red White and Blue Mixed Berry Dessert – Step by Step
Step 1: Crafting the Crunchy Foundation
First, we need to build our base, which is arguably the most important part of the Step by Step process. In a medium-sized bowl, toss your graham cracker crumbs with that melted unsalted butter. Take a fork and blend them until the mixture looks like wet, golden sand. Before you do anything else, grab a spoon and scoop out about 3 tablespoons of these buttery crumbs and put them in a small dish. We are saving these as a garnish to give the top a little sparkle later. Now, grab a 9×13-inch pan and give it a quick spritz with non-stick spray. Dump the rest of the crumbs in and press them down firmly. I usually use the bottom of a measuring cup to really pack them in so the crust doesn’t crumble when you slice it. This is a vital Step by Step move to ensure your dessert has a solid “floor.”
Step 2: Whipping Up the Fluffy Cream Layers
Next in our Step by Step guide, we tackle the “White” part of our dessert. Grab a large mixing bowl and your electric mixer. Toss in the softened cream cheese, the confectioners’ sugar, and one teaspoon of the vanilla. Beat this on medium-high until it is totally smooth and looks like frosting. In a different bowl—one that you’ve hopefully chilled in the freezer for a few minutes—pour in your cold heavy cream, the granulated sugar, and the rest of the vanilla. Whip this until it forms stiff peaks, meaning when you lift the beaters, the cream stands up straight. Now, here is the secret Step by Step trick: gently fold that whipped cream into the cream cheese mixture using a spatula. Don’t stir it like crazy or you’ll deflate all that beautiful air. Just turn it over and over until it’s one big, fluffy cloud of goodness.
Step 3: The Art of the Red Layer
Now we start the assembly, which is the most satisfying Step by Step part of the whole project. Take about one-third of your cream mixture—this is roughly 3 cups—and spread it over your crust. Try to get it all the way to the edges. Next, open your can of strawberry pie filling. Instead of just dumping it in the middle, drop spoonfuls of it all over the cream layer. Then, use the back of a spoon to gently connect those dots. This Step by Step method prevents the fruit from sinking or mixing too much with the cream, keeping those colors looking sharp and bright for the final reveal.
Step 4: Adding the Blue and Final Touches
To keep moving through our Step by Step assembly, spread another third of the cream mixture over the strawberries. Be super gentle here so you don’t pick up any red streaks. Once that’s smooth, repeat the “dotting” process with the blueberry pie filling. Spread it out until the blue layer is even and gorgeous. Finally, top the whole thing with the last of your cream mixture, smoothing it out to create a clean, white finish. Grab those reserved graham cracker crumbs and sprinkle them over the top like confetti. Cover the pan tightly with plastic wrap. This is the hardest Step by Step instruction: you have to put it in the fridge and leave it there overnight. It needs those hours to set up so it becomes sliceable and the flavors can really get to know each other.
What to Serve with Red White and Blue Mixed Berry Dessert
Since this Red White and Blue Mixed Berry Dessert is already quite rich and creamy, you don’t need much else to make it a complete experience. If you are hosting a summer party, it pairs beautifully with grilled favorites like honey-mustard chicken or a classic burger. To keep things light, a side of fresh watermelon or a crisp cucumber salad balances out the sweetness. For the adults, a chilled glass of rosé or a light sparkling lemonade works wonders. If you want to go totally over the top, a small scoop of lemon sorbet on the side adds a zesty kick that cuts through the creaminess of the layers.
Key Tips for Making Red White and Blue Mixed Berry Dessert
The biggest tip for a perfect Red White and Blue Mixed Berry Dessert is all about temperature. If your cream cheese is even slightly cold, you will get lumps, and no one wants a chunky dessert. If you forgot to take it out of the fridge, you can unwrap it and microwave it for about 15 seconds to take the chill off. Also, when you are spreading the layers, don’t rush. It’s tempting to just swish the spoon around, but being delicate ensures those red, white, and blue layers stay distinct and don’t turn into a purple mess. If you find the cream mixture is getting a bit soft while you work, don’t be afraid to pop the bowl back in the fridge for ten minutes to firm it up.
Storage and Reheating Tips Red White and Blue Mixed Berry Dessert
You should always keep your Red White and Blue Mixed Berry Dessert in the refrigerator. Because of the high dairy content from the cream cheese and whipping cream, it won’t hold up well at room temperature for more than an hour—especially if you’re outside in the sun! If you have leftovers, keep them tightly covered with plastic wrap or a lid. It will stay fresh and delicious for about 3 to 4 days. I actually think the crust gets a little softer and more “cake-like” on day two, which some people prefer. Do not try to reheat this; it’s meant to be eaten cold, and the microwave would turn your beautiful layers into a colorful soup!
FAQs
Can I use fresh berries instead of pie filling? You can, but you’ll need to cook them down with a bit of sugar and cornstarch first to create a thick sauce. Fresh berries on their own might release too much juice and make the layers runny.
Is there a way to make this lower in fat? You could try using light cream cheese or a whipped topping like Cool Whip, though the flavor won’t be quite as rich. Just know that light versions can sometimes be a bit more watery.
Can I freeze this dessert? Yes! It actually makes a great frozen treat. Just wrap it very well to prevent freezer burn. Let it thaw in the fridge for about 30 minutes before serving so it’s easy to slice.
Final Thoughts
Making this Red White and Blue Mixed Berry Dessert is honestly a joy because it’s so low-stress but high-reward. In my California kitchen, I’m always looking for ways to blend fresh ideas with easy techniques, and this recipe is the perfect example of that. It’s more than just a dish; it’s a way to bring people together without spending your whole day tied to the stove. The combination of the sweet strawberries and tart blueberries nestled in that fluffy cream is something your friends will be asking for every single year. So, grab your 9×13 pan, put on some music, and get layering. You’ve totally got this, and I promise the smiles on your family’s faces will be worth every second of waiting for it to chill. Enjoy every bite of your beautiful Red White and Blue Mixed Berry Dessert!
Print
Red White and Blue Mixed Berry Dessert
- Prep Time: 20
- Cook Time: 8
- Total Time: 120
- Yield: 8 servings 1x
- Category: desserts
- Method: Baking
- Cuisine: American
- Diet: Vegetarian
Description
A patriotic dessert featuring a graham cracker crust, silky cream cheese and whipped vanilla layers, and vibrant canned mixed berry filling. Simple, crowd-pleasing, and perfect for celebrations.
Ingredients
1 1/2 cups graham cracker crumbs
1/3 cup butter, softened
2 tablespoons sugar
8 oz cream cheese, softened
1 teaspoon vanilla extract
1 cup heavy whipping cream
1 can (14 oz) mixed berry pie filling
1 cup whipped cream for topping
Instructions
Preheat oven to 350°F (180°C)
In a bowl, mix graham crumbs, butter, and sugar until combined
Press mixture into a 9-inch pie dish and bake for 8 minutes
Let crust cool completely
Beat cream cheese and vanilla until smooth
Fold in whipped cream until light and fluffy
Spread half the cream cheese mixture over cooled crust
Add 1/2 the pie filling, then top with remaining cream cheese layer
Add remaining pie filling, then chill for 1 hour
Serve with additional whipped cream
Notes
Use non-alcoholic vanilla extract
For a halal option, ensure all dairy comes from halal-certified sources
Store in refrigerator up to 3 days
Fresh berries can substitute canned filling if available
Nutrition
- Serving Size: 1 serving
- Calories: 320
- Sugar: 22g
- Sodium: 240mg
- Fat: 20g
- Saturated Fat: 12g
- Carbohydrates: 36g
- Fiber: 1g
- Protein: 5g
- Cholesterol: 60mg